Connecting by Wired LAN via a Router or Switching Hub (PXW-Z300 / PXW-Z200 / HXR-NX800 / ILME-FX6 / MPC-2610)
You can connect a camera and a control device by connecting the camera and control device via wired LAN to the same router or switching hub.
This connection method supports multi-camera monitoring.
Note
- On Android, connection using a switching hub is not supported.
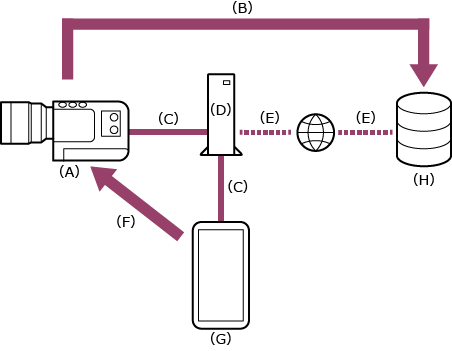
(A) Camera
(B) File transfer
(C) Wired LAN connection
(D) Router or switching hub
(E) Internet connection
(F) Remote control
(G) Control device on which this app is installed
(H) Server
-

 : Connect a camera and control device to the same router or switching hub.
Hint
- Depending on the camera, a LAN adapter may be required. For details about verified compatible LAN adapters, refer to the Monitor & Control support page.
Note
- It is not possible to connect the camera and control device directly via a wired LAN. The connection must go via a router or switching hub.
-
: Press and hold the MENU (Menu) button to display the menu.
-
: Configure the following settings if a user name and password have not been configured on the camera.
- Set the user name.
- ILME-FX6: [Network] – [Access Authentication] – [User Name]
- PXW-Z300 / PXW-Z200 / HXR-NX800 / MPC-2610: [Network] – [Network Setup] – [User Name]
- Automatically generate a new password.
- ILME-FX6: [Network] – [Access Authentication] – [Generate Password]
- PXW-Z300 / PXW-Z200 / HXR-NX800 / MPC-2610: [Network] – [Network Setup] – [Generate Password]
Hint
- You can also configure a password manually using the following menu items.
- ILME-FX6: [Network] – [Access Authentication] – [Input Password]
- PXW-Z300 / PXW-Z200 / HXR-NX800 / MPC-2610: [Network] – [Network Setup] – [Input Password]
- The user name and password can be viewed as text and QR code.
- ILME-FX6: [Network] – [Access Authentication] – [Show Settings]
- PXW-Z300 / PXW-Z200 / HXR-NX800 / MPC-2610: [Network] – [Network Setup] – [Show Authentication]
Note
- Be careful not to let others see your QR code or password.
- Set the user name.
-
: Select [Network] – [Wired LAN] – [Setting] – [On].
Wired LAN connections are enabled.
-
: Select [Network] – [Wired LAN] – [Camera Remote Control] – [Enable].
Camera remote control is enabled.
-
: Set the IP address of the camera (setting is not required if using a router with DHCP enabled).
- Select [Network] – [Wired LAN] – [Detail Settings] – [DHCP] – [Off].
- Set the IP address, subnet mask, and gateway.
(Example)
IP address: 192.168.0.10
Subnet mask: 255.255.255.0
Gateway: 192.168.0.1
-
: Set the IP address of the control device (setting is not required if using a router with DHCP enabled).
- Select [Settings] – [Wi-Fi].
- Tap the “i” icon on the right of the connected network name (SSID).
- Select [Configure IP] – [Manual].
- Set the IP address, subnet mask, and router.
(Example)
IP address: 192.168.0.100*
Subnet mask: 255.255.255.0
Router: 192.168.0.1
* Set the number in the “100” field to a number that does not conflict with any cameras or other control devices. - Tap [Save].
-
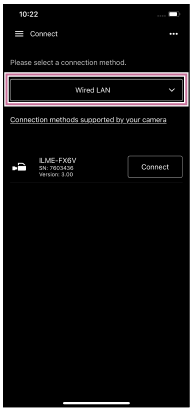
 : Launch the app and tap
  (App menu) – [Connect].
 -
: Select [Wired LAN] on the connection screen.
-
: Tap [Connect] for the camera to connect on the connection screen.
-
: Authenticate access for the connection to enable encrypted communication with the camera.
- Access authentication is required when you connect for the first time. Perform access authentication as described in “Authenticating Access When Connecting to a Camera (PXW-Z300 / PXW-Z200 / HXR-NX800 / ILME-FX6 / MPC-2610).”
If you have trouble connecting
Refer to the Monitor & Control support page.
TP1001691005