Transferring Files to “C3 Portal”
You can transfer files to the “C3 Portal” cloud service using the “Creators' App for enterprise” application.
-
Execute [Network] – [Network Setup] – [Setup for Mobile App] in the full menu.
A confirmation screen appears for items that will be updated automatically.
The following settings in the [Network] menu are selected automatically.
- [USB Tethering] – [Setting] – [On]
- [USB Tethering] – [Camera Remote Control] – [Enable]
-
Check the settings and select [OK].
The configuration starts.
A configuration message appears.
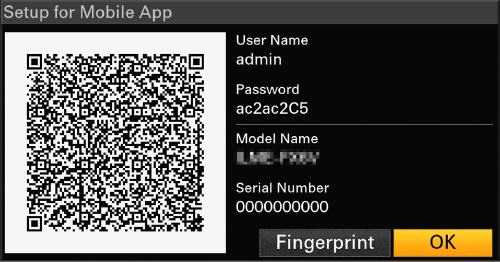
When the configuration is completed, the access authentication screen appears on the LCD monitor/viewfinder.

The following information is displayed on the screen.
User name/password/fingerprint/camera model name/serial number
Hint
- This screen is not output to the video output.
Note
- Take care that the password cannot be viewed and the QR code image cannot be copied by others.
- Start “Creators' App for enterprise” on the smartphone and sign in to the “C3 Portal” cloud service.
- Connect a USB cable to the USB-C connector of the unit, and then connect the smartphone.
-
Enable the USB tethering function on the smartphone.
For details, refer to the operation manual for the smartphone.
-
Follow the instructions on the “Creators' App for enterprise” screen and scan the QR code displayed on the LCD monitor of the unit.
File transfer setup information is sent from the smartphone to the unit, and the following screen appears on the unit.

-
Select [OK].
The setup information starts loading.
When the setup is loaded successfully, a message appears.
Note
- “Creators' App for enterprise” overwrites the [Network] – [File Transfer] setting of the unit.
- [Root Certificate] cannot be set automatically. Configure manually.
Transferring original clips
Set using the [File Transfer] status screen or set [Network] – [File Transfer] – [Auto Upload] to [On] in the full menu to enable transfer of original clips to “C3 Portal.”
Each time a recording finishes, the clip is transferred to the location associated with your “C3 Portal” account.
Transferring proxy clips
Set using the [File Transfer] status screen or set [Network] – [File Transfer] – [Auto Upload (Proxy)] to [On] in the full menu to enable transfer of proxy clips to “C3 Portal.”
Each time a recording finishes, the clip is transferred to the location associated with your “C3 Portal” account.
Hint
- Files transferred from the unit are cached in “Creators' App for enterprise” and then transferred to “C3 Portal.” The file transfer status display on the unit indicates the transfer status to “Creators' App for enterprise.”
- When the file transfer from the unit to “Creators' App for enterprise” is completed, you can turn off the unit but note that file transfer from the smartphone may be continuing. Be aware of the remaining battery charge on the smartphone.
- You can transfer any clips to “C3 Portal.” For details, see the following topic.
Selecting and Transferring a Clip - You can import 3D LUT files stored in “C3 Portal” into the unit.
- You can save an All file created by the unit in “C3 Portal” and then load it from “C3 Portal.”
Other functions that use “C3 Portal”
Managing 3D LUT files
You can import 3D LUT files stored in “C3 Portal” into the unit.
Managing All files
You can save an All file created on the unit in “C3 Portal” and load an All file from “C3 Portal.”
