-
Launch this app.
The splash screen appears and then the service selection screen appears.
-
Select the service to which you want to connect.
The region selection screen appears.
Note
- Switch [Use This Service Next Time] to the on position, as required.
-
Select the country or region where you will use this app.
The software usage agreement appears.
Note
- You can change the country or region on the [App Information] screen. After changing the setting, you will be logged out automatically and you will need to log in again.
-
Read the software usage agreement and tap [Agree].
A screen appears for connecting to the service selected in step 2.
-
Connect to the service.
-
When connecting to C3 Portal: Set [Auto Login] to the on position as required, and tap [Sign in] or [Sign in with Custom IdP]. When the sign in screen appears, proceed to step 6.
Hint
- To sign in using Professional ID, tap [Sign in]. To sign in using a custom IdP, tap [Sign in with Custom IdP].
- To use this app without signing in, tap [Skip sign in]. The Home screen appears in offline mode.

-
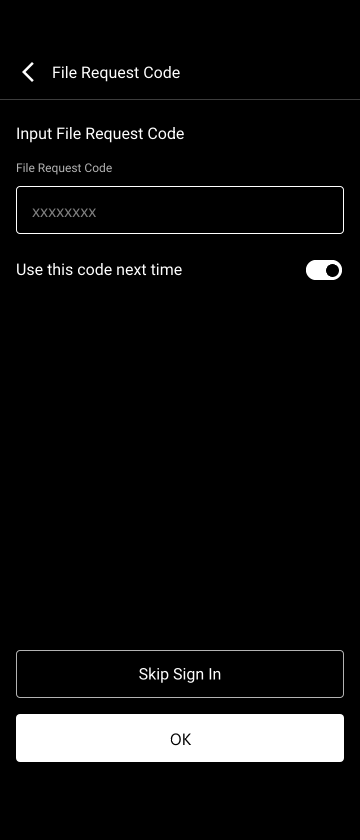
When connecting to Ci: Enter the file request code sent by an administrator, set [Use This Code Next Time] to the on position as required, and tap [OK]. This app verifies the file request information, and the Home screen appears if verification is successful.
Hint
- To use this app without entering a file request code, tap [Skip sign in]. The Home screen appears in offline mode.
Note
- When connecting to C3 Portal, if [Auto Login] is set to the on position, you will need to log out first and log in again if you want to subsequently set this to the off position. For details about how to log out, see the “Returning to the Sign-In Screen” topic.
- When connecting to Ci, if [Use This Code Next Time] is set to the on position, you will need to use the Home screen or the file request code entry screen from the [Manage File Request Code] screen if you want to subsequently set this to the off position. For details, see the “Structure of the Clip List Screen” topic or “Managing File Request Codes (Ci connections only)” topic.
-
Enter your user ID and password on the displayed sign in screen to sign in.
-
For user accounts that require 2-factor authentication, enter the passcode on the displayed 2-factor authentication screen and tap [Authenticate].
-
If using an Android device, tap [Continue] in the displayed pop-up.
After logging in, the Home screen appears.
Note
- If you move this app to the background during the login process, the login process cannot be resumed. In this case, close the browser in the app to return to the login screen and then sign in again.