Structure of the Clip List Screen
Tap ![]() (Clip List) in the launcher bar to display the clip list.
(Clip List) in the launcher bar to display the clip list.
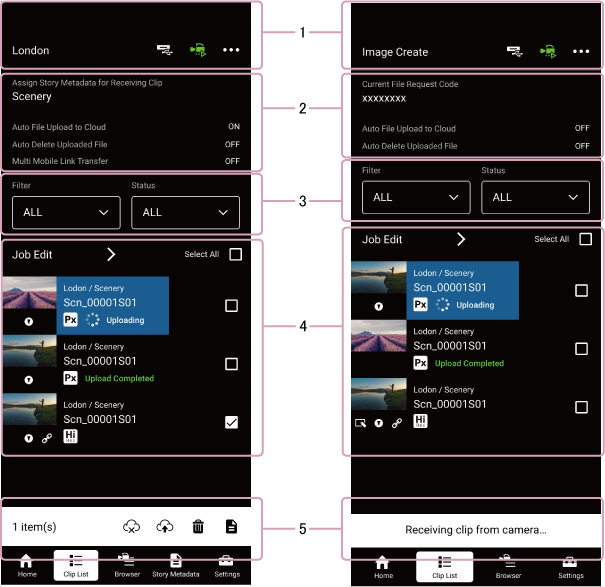
1. Header area
When [Assign Story Metadata for Received Clips] is set to [Unassigned], displays the name of the group to which to upload clips that have no assigned story metadata.
2. Settings information display area
-
[Assign Story Metadata for Received Clips] (C3 Portal connections only)
When a clip is transferred from a camera, the story metadata displayed here is automatically assigned to the clip. You can change the story metadata to be assigned on the [Edit Story Metadata] screen. -
[Current File Request Code] (Ci connections only)
Displays the file request code being used. You can press [Change File Request Code] on the [Manage File Request Code] screen to change the file request code to use. -
[Auto File Upload to Cloud]
Displays whether the function for automatically uploading clips in the clip list to the cloud service is on or off. The on/off switching is configured on the Home screen or [Upload Settings] screen. -
[Auto Delete Uploaded File]
Displays whether the function for automatically deleting clip data saved on the smartphone after uploading the clip to the cloud service is on or off. The on/off switching is configured on the [Upload Settings] screen.Note
- When this function is on, clip data uploaded to the cloud service is deleted from the smartphone. The clip list handling varies depending on the connected cloud service.
- For C3 Portal connections: Clips deleted automatically still appear in the clip list, but can no longer be previewed.
- For Ci connections: Clips deleted automatically still appear in the clip list immediately after being deleted, but are deleted from the clip list when the file request code is changed.
- When this function is on, clip data uploaded to the cloud service is deleted from the smartphone. The clip list handling varies depending on the connected cloud service.
-
[Multi Mobile Link Transfer] (Android version only) (C3 Portal connections only)
Displays the setting of the Multi Mobile Link Transfer function. This item is displayed only when an option license is activated.Note
- Support for this function on iOS is planned for a future release.
3. Filtering/job edit area
-
[Filter]
Filters the clip list display according to the story metadata assigned to the clips. You can also filter by clip type (proxy, high-res, chunk file transfer in progress).Note
- Filtering by story metadata is supported for C3 Portal connections only.
- Filtering of clips during chunk file transfer is supported for C3 Portal connections only.
-
[Status]
Filters the clip list display according to the upload status and essence marks of the clips. -
[Job Edit]
Tap to display the [Job Edit] screen.
4. Clip information display area

Note
- When there are no clips displayed on the Clip List screen, the [Camera] button and [Media Card Reader] button are displayed in the same way as on the Home screen.
-
Thumbnail view
Displays clip thumbnails. An icon indicating the status of a clip is also displayed below the thumbnail. However, when a clip is being uploaded using chunk file transfer, “CHUNK” is displayed instead of the thumbnail.Note
- Chunk file transfer is supported for C3 Portal connections only.
Clip status
-
 (Essence mark): Indicates the presence of essence marks in a clip.
 -
 (Link): Indicates that the high-resolution file and proxy file are linked. Displayed only for high-resolution files.
 -
 (Metadata unedited): Indicates that required metadata has not been edited. Displayed only for Ci connections.
-
Selection button
Tap to select clip. To select all clips, place a check mark in [Select All] at the top right of the list. -
Group/story metadata display
Displays the group and story metadata assigned to the clip. -
Clip name
Displays the name of the clip. -
Status display
Displays the upload status and clip information.Upload status
- [Upload Waiting]: Waiting to upload
- [Uploading]: Uploading
- [Upload Completed]: Upload completed
- [Upload Canceling]: Upload canceled
- [Upload Pending]: Upload is temporarily stopped because this app is busy with chunk file transfer from the camera or other reason.
- [Upload Suspended]: Paused due to operation canceled by the user
- [Upload Error]: Error occurred during uploading
Clip information
-
 (High-Res): Indicates that the clip is a high-resolution file.
 -
 (Proxy): Indicates that the clip is a proxy file.
 -
 (Chunk file): Indicates that the clip is a chunk file. Displayed only for C3 Portal connections.
Note
- If the recording time of a chunk file transfer clip is lower than the value specified on the camera, that clip is handled as a normal proxy file and not as a chunk file.
5. Action bar / message
When a clip is selected, displays icons for controlling clip operations. Icons for operations that cannot be executed are disabled.
Messages are displayed while transferring a clip from a camera or copying a clip from a card reader.
-
 (Start upload): Start uploading the selected clip. If multiple clips are selected, the upload will start from the clip at the bottom of the list.
Note
- When connected to Ci, clips for which required metadata has not been edited cannot be uploaded. Edit the metadata and then upload.
-
 (Stop upload): Stop uploading the clip.
 -
 (Delete clip): Delete the selected clip.
 -
 (Assign story metadata/edit metadata): Assign story metadata to the selected clip when connected to C3 Portal. Tap the icon and select the story metadata in the displayed dialog. Edit the metadata for the selected clip when connected to Ci.