Connecting to a Camera (models that support QR code connection)
-
Tap the [Camera] button on the Home screen.The [Select Camera Connection Method] screen appears.
-
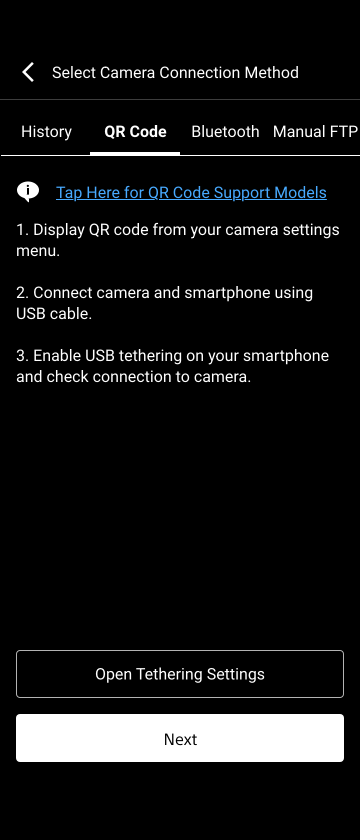
Tap the [QR Code] tab.
Models that have been previously connected via QR code, Bluetooth, or remote shooting function are displayed on the [History] tab on the [Select Camera Connection Method] screen. If the camera to which you want to connect is displayed, select the camera information field and tap [Connect] to initiate the connection.
-
Tap [Next].
A message appears if the USB tethering function is inactive. Connect the smartphone on which this app is installed to a camera using a USB cable, and enable the USB tethering functions of the smartphone and camera.
For details about configuring the USB tethering function, refer to the operating instructions of each device.
Note
- After enabling the USB tethering function on a smartphone, it may take a short while to establish a connection with a camera.
-
Operate the camera to display the QR code from the camera menu.For details about how to display the QR code, refer to the operating instructions of the camera.
-
Scan the QR code displayed on the camera using this app.
Note
- Position the QR code within the frame displayed on the scan screen of this app.
- If scanning the QR code takes some time or a read error occurs, adjust the brightness of the QR code display screen of the camera and then scan the QR code again.
-
If a connection confirmation message appears, configure the file auto transfer function of the camera, and press [OK].Connection between this app and the camera is initiated.
Note
- Perform this step only if [Automatically apply the following settings when connecting to a new camera] is set to the off position on the [Settings] > [Camera Settings] screen. This step is skipped if [Automatically apply the following settings when connecting to a new camera] is set to the on position.
-
Check the message displayed on the camera and press [OK].The [Finish] button in this app becomes enabled.
-
Tap [Finish] in this app.
The Home screen appears. Check that the information for the connected camera is displayed.
Note
- The Home screen will appear automatically after a while even if you do not tap [Finish].
- When you connect a camera with this app, a message confirming whether the network file can be loaded appears on the camera. Allow the operation to proceed.
- If the camera information is not displayed in this app, check that the smartphone and camera are connected properly via USB.
- When a camera is selected and connected from the connection history list, the transfer settings of the previous camera are applied by loading the network file. Check the transfer settings of the camera.
- When you connect to a camera using this app for the first time, select the group you want linked to the camera. To change the group linked to the camera, you can scan the QR code again to reconfigure the connection settings or use C3 Portal.