Shooting movies (Intelligent Auto)
This section describes how to record movies in the [Intelligent Auto] mode. In the [Intelligent Auto] mode, the camera automatically focuses and automatically determines the exposure based on the recording conditions.
- Set the Still/Movie/S&Q dial to
 (Movie) to select the movie recording mode.

- Turn the Still/Movie/S&Q dial while pressing the lock release button on the front of the Still/Movie/S&Q dial.
- Set the mode dial to
 (Auto Mode).
The shooting mode will be set to
 (Intelligent Auto).
- Turn the mode dial while pressing the mode dial lock release button in the center of the mode dial.
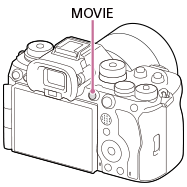
- Press the MOVIE (Movie) button to start recording.

- Press the MOVIE button again to stop recording.
To shoot with the touch function icons
You can also start shooting by touching an icon on the screen instead of pressing the MOVIE (movie) button. Swipe the monitor left or right to display the touch function icons, and then touch the  (start recording) icon. You can view the captured image by touching the
  (switch to playback screen) icon.
For details on how to display the touch function icons, see “Touch function icons.”
To select the recording format (
 File Format)
The resolution and degree of compatibility vary depending on the recording format (XAVC HS 4K/XAVC S 4K/XAVC S HD/XAVC S-I 4K/XAVC S-I HD). Select the format in accordance with the purpose of the movie to be shot.
To select the frame rate or image quality (
 Movie Settings)
The frame rate determines the smoothness of motion in movies.
([ Movie Settings] → [Rec Frame Rate])
The image quality changes with the bit rate. ([ Movie Settings] → [Record Setting])
If the bit rate is high, the amount of information will increase and you can shoot high-quality movies. However, this will result in a larger volume of data.
Select the frame rate and bit rate according to your preference and purpose.
To adjust the exposure (Exposure Ctrl Type/Exposure mode)
When [Exposure Ctrl Type] is set to [P/A/S/M Mode], select the exposure mode using the shutter speed and aperture value combination in the same way as when shooting a still image.
When [Exposure Ctrl Type] is set to [Flexible Exp. Mode], you can set the shutter speed, aperture value, and ISO sensitivity automatically or manually.
Also, if you enable [Touch AE] under [Touch Func. in Shooting], you can adjust the exposure to the touched area.
To select the focusing method (focus mode/focus area)
Use the focus mode dial to select AF-C (Continuous AF) or MF (Manual Focus).
You can specify the focus area by setting [ Focus Area].
Even during shooting with manual focus, you can temporarily switch to auto focus in the following ways.
- Press the custom key to which [AF On] is assigned, or press the shutter button halfway.
- Press the custom key to which [Subject Recognition AF] is assigned.
- Touch the subject on the monitor. (when [Touch Func. in Shooting] under [Shooting Screen] is set to [Touch Focus] or [Touch Tracking])
To record movie audio in 4 channels
Attach a genuine Sony accessory that supports 4-channel and 24-bit audio recording to the Multi Interface Shoe of the camera.
Hint
- You can also assign the start/stop movie recording function to a preferred key.
- You can focus quickly while shooting movies by pressing the shutter button halfway down. (The sound of auto focus operation may be recorded in some cases.)
- You can change the settings for ISO sensitivity, exposure compensation, and focus area while shooting movies.
- The sounds of the camera and lens in operation may be recorded during movie shooting. To prevent sounds from being recorded, set [Audio Recording] to [Off].
- To prevent the operating sound of the zoom ring from being recorded when a power zoom lens is used, we recommend recording movies using the zoom lever of the lens. When moving the zoom lever of the lens, be careful not to flip the lever.
- When [Auto Power OFF Temp.] is set to [High], the camera can continue movie recording even when the temperature of the camera becomes high.
Note
- An icon indicating that data is being written is displayed after shooting. Do not remove the memory card while the icon is displayed.
- You cannot start recording a movie while writing data. Wait until data writing is completed and “STBY” is displayed before recording a movie.
- If the
 (Overheating warning) icon appears, the temperature of the camera has risen. Turn the power off and cool the camera and wait until the camera is ready to shoot again.
 - The temperature of the camera tends to rise when shooting movies continuously, and you may feel that the camera is warm. This is not a malfunction. Also, [Internal temp. high. Allow it to cool.] may appear. In such cases, turn the power off and cool the camera and wait until the camera is ready to shoot again.
- For the continuous shooting time of a movie recording, refer to “Recordable movie times.” When movie recording is finished, you can record another movie by pressing the MOVIE button again. Recording may stop to protect the product, depending on the temperature of the product or the battery.
- Still images cannot be captured during movie recording. If you want to create a still image from a scene during movie recording, use [
 AutoCreateStillImage].
