Rear side
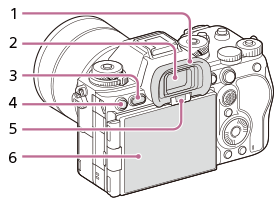
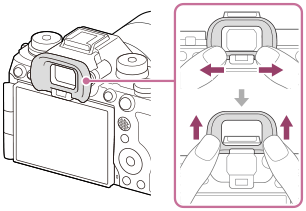
- Eyepiece Cup
To remove the eyepiece cup
Push the grips at the bottom of the eyepiece cup to the left and right and lift up the cup.
- Viewfinder
- MENU button
- For shooting: C3 button (Custom button 3)
For viewing:
 (Protect) button
 - Eye sensor
- Monitor (For touch operation: Touch panel/Touch pad)
You can adjust the monitor to an easily viewable angle and shoot from any position. For details, see “Adjusting the monitor angle.”
- You may not be able to adjust the monitor angle depending on the type of a tripod you use. In such a case, release the tripod screw once to adjust the monitor angle.
- Do not apply excessive force when opening, closing, or rotating the monitor. Doing so may cause a malfunction.
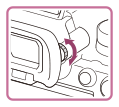
- Diopter-adjustment dial
Adjust the diopter-adjustment dial according to your eyesight until the display appears clearly in the viewfinder.
If it is hard to operate the diopter-adjustment dial, remove the eyepiece cup before operating the dial.
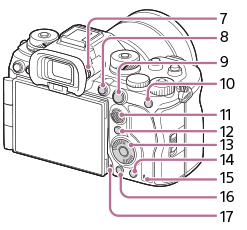
- MOVIE (Movie) button
- For shooting: AF-ON (AF On) button
For viewing:
 (Enlarge) button
 - For shooting: AEL button
[AEL hold] is assigned to the AEL button in the default settings.
For viewing:
 (Image index) button
 - Multi-selector
- Fn (Function) button
- Control wheel
- For shooting: C4 button (Custom button 4)
For viewing:
 (Delete) button
 - Access lamp
-
 (Playback) button
 - Microphone for the voice memo function
Adjusting the monitor angle
- When holding the camera in the high or low position, pull the monitor toward you to adjust the angle.
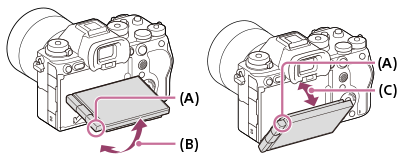
(A): Where to place your fingers
(B): Approx. 98° from the rear surface of the camera
(C): Approx. 40° from the rear surface of the camera
- In the self-portrait position with the monitor open sideways and the lens facing toward you, the monitor image is flipped horizontally. Rotate the monitor backwards to cancel the flipped display.
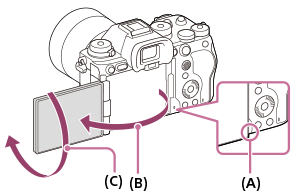
(A): Where to place your fingers
(B): Approx. 180°
(C): Approx. 270°
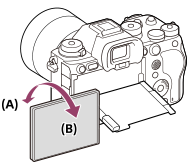
- When you want to switch the display orientation to the self-portrait mode with the monitor pulled out, rotate the monitor all the way in the direction of (A). If you want to cancel the display orientation for the self-portrait mode, rotate the monitor all the way in the direction of (B) (when [Monitor Flip Direction] is set to [Auto]).
- In the default settings, the inversion of the display is automatically switched on and off depending on how the monitor is positioned. You can lock the display method with the following settings: MENU →
 (Setup) → [Finder/Monitor] → [Monitor Flip Direction].