Selecting the focus area (Focus Area)

Set the type of focusing frame when shooting with the auto focus. Select the mode according to the subject.
- MENU →
 (Focus) → [Focus Area] → [
 Focus Area] → desired setting.
Menu item details
-
 Wide:
Wide: - Focuses on a subject covering the whole range of the screen automatically. When you press the shutter button halfway down in the still image shooting mode, a green frame is displayed around the area that is in focus.
-
-
 Zone:
Zone: - Select a zone on the monitor on which to focus, and the product will automatically select a focus area.
-
-
 Center Fix:
 - Focuses automatically on a subject in the center of the image. Use together with the focus-lock function to create the composition you want.
-
-
 Spot: XL/Spot: L/Spot: M/Spot: S/Spot: XS
:
Spot: XL/Spot: L/Spot: M/Spot: S/Spot: XS
: - Allows you to move the focusing frame to a desired point on the screen and focus on an extremely small subject in a narrow area.
-
-
 Expand Spot:
 - If the product cannot focus on a single selected point, it uses focus points around the [Spot] as a secondary priority area for focusing.
-
-
 Custom 1/Custom 2/Custom 3:
 - Allows you to set the shape and size of the focusing area.
-
-


 Tracking:
-
This setting is available only when the focus mode is set to [Continuous AF].
When the shutter button is pressed and held halfway down, the product tracks the subject within the selected autofocus area. Point the cursor at [Tracking] on the [Focus Area] setting screen, and then select the desired area to start tracking using the left/right sides of the control wheel.
You can also move the tracking start area to the desired point by designating the area as [Tracking: Zone], [Tracking: Spot XL]/[Tracking: Spot L]/[Tracking: Spot M]/[Tracking: Spot S]/[Tracking: Spot XS], [Tracking: Expand Spot], or [Tracking: Custom 1] through [Tracking: Custom 3].
Hint
- In the default settings, [Focus Area] is assigned to the C2 button.
Note
-
[Focus Area] is locked to [Wide] in the following situations:
- [Intelligent Auto]
- The focus area may not light up during continuous shooting or when the shutter button is pressed all the way down at once.
-
When the Still/Movie/S&Q dial is set to
 (Movie) or S&Q (S&Q Motion) or during movie shooting, [Tracking] cannot be selected for [Focus Area].
-
[Spot: XS] under [Focus Area] cannot be selected when shooting in the APS-C size. Also, when [Focus Area] is set to [Custom 1] - [Custom 3], the size of the focus frame cannot be set smaller than that of [Spot: S].
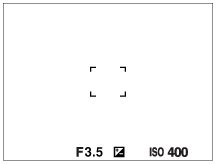
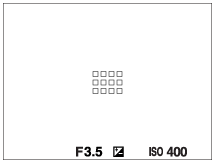
Examples of the focusing frame display
The focusing frame differs as follows.
When focusing on a larger area
When focusing on a smaller area
- When [Focus Area] is set to [Wide] or [Zone], the focusing frame may switch between “When focusing on a larger area” and “When focusing on a smaller area” depending on the subject or situation.
-
When [Focus Area] is set to [Custom], the focusing frame may switch to “When focusing on a smaller area” if either the vertical or horizontal side of the focus area is longer than the side of the focusing frame for [Spot: XL].
- When you attach an A-mount lens with a Mount Adaptor (LA-EA3 or LA-EA5) (sold separately), the focusing frame for “When focusing on a smaller area” may be displayed.
When focus is achieved automatically based on the whole range of the monitor

-
When you use a zoom function other than the optical zoom in the still image shooting mode, the [Focus Area] setting is disabled and the focusing frame is shown by the dotted line. The AF operates with priority on and around the center area.
To change the shape and size of the focus area ([Custom])
If you press the  (Delete) button on the screen when an option from [Custom 1] to [Custom 3] is selected for [Focus Area], a screen for setting the shape and size of the focus frame will be displayed. Use the front dial/rear dial L/control wheel to set the shape and size of the focus frame.
Front dial: Changes the height of the focus frame.
Rear dial L: Changes the width of the focus frame.
Rotating the control wheel: Enlarges/reduces the size of the focus frame.
- The shape and size of the focus frame can also be set using touch operations. Drag the four corners or sides of the focus frame. You can also enlarge/reduce the size of the focus frame by pinching in/out on the monitor.
- You can change the position of the focus frame with the multi selector or the top/bottom/left/right of the control wheel.
- Press the (Delete) button to return the focus frame shape and size to the default settings.
To move the focus area
-
You can move the focus area by operating the multi-selector when [Focus Area] is set to the following parameters:
- [Zone]
- [Spot: XL]/[Spot: L]/[Spot: M]/[Spot: S]/[Spot: XS]
- [Expand Spot]
- [Custom 1] - [Custom 3]
- [Tracking: Zone]
- [Tracking: Spot XL]/[Tracking: Spot L]/[Tracking: Spot M]/[Tracking: Spot S]/[Tracking: Spot XS]
- [Tracking: Expand Spot]
- [Tracking: Custom 1] - [Tracking: Custom 3]
Hint
-
When [Focus Area] is set to one of the following, you can move the focusing frame over a greater distance at a time by setting [AF Frame Move Amt] to [Large].
- [Spot]
- [Expand Spot]
- [Custom 1] - [Custom 3]
- You can move the focusing frame quickly by touching and dragging it on the monitor. Set [Touch Operation] to [On], and set [Touch Func. in Shooting] under [Shooting Screen] in [Touch Panel Settings] to [Touch Focus] beforehand.
To track the subject temporarily when shooting still images and movies (Tracking On)
You can temporarily change the setting for [Focus Area] to [Tracking] while pressing and holding down the custom key to which you have assigned [Tracking On] with [ Custom Key/Dial Set.] or [Custom Key/Dial Set.] in advance.
The [Focus Area] setting before you activated [Tracking On] will switch to the equivalent [Tracking] setting.
Custom Key/Dial Set.] or [Custom Key/Dial Set.] in advance.
The [Focus Area] setting before you activated [Tracking On] will switch to the equivalent [Tracking] setting.
For example:
|
[Focus Area] before you activate [Tracking On] |
[Focus Area] while [Tracking On] is active |
|---|---|
| [Wide] | [Tracking: Wide] |
| [Spot: S] | [Tracking: Spot S] |
| [Expand Spot] | [Tracking: Expand Spot] |
Hint
- When [Tracking On + AF On] or [Tracking On
 +
+  ] is assigned to a custom key using [Custom Key/Dial Set.], while the custom key is pressed during still image shooting, autofocus works simultaneously with tracking to keep the subject in focus.
[Tracking On + AF On]: Tracks the subject in the focus area according to the setting for [
Focus Area] before you pressed the custom key.[Tracking On
+ ]: Tracks the subject in the center of the screen despite the setting for [Focus Area] before you pressed the custom key.
Phase detection AF
When there are phase detection AF points within the auto focus area, the product uses the combined autofocus of the phase detection AF and contrast AF.
Note
-
Phase detection AF is available only when a compatible lens is attached. If you use a lens that does not support phase detection AF, you cannot use the following functions.
- [AF Lvl for Crossing]
- [AF Trk for Spd Chng]
- [AF Subj. Shift Sensitivity]
- [AF Transition Speed]
Also, even if you use a previously purchased applicable lens, the phase detection AF might not function unless you update the lens.