Displaying the Control Window of a Projector with a Web Browser
Display the control window of the projector with a web browser and configure the network settings.
-
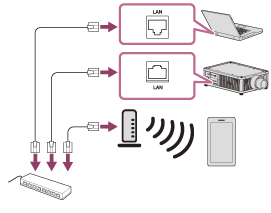
Connect the projector and smartphone/computer to a hub or router using LAN cables (straight) (not supplied) or Wi-Fi.
-
Press the MENU button.
-
Select
 [Setup], then set [Web Control UI] to [On].
 -
Select
 [Installation], then configure the network settings under [Network Setting].
For details on the setting method, see the "Menu Operation: Network Setting " page.
-
Start a web browser, enter the following into the address field, then press the Enter key.
http://xxx.xxx.xxx.xxx
(xxx.xxx.xxx.xxx: IP address of the projector)
When connecting by the IPv6 address
http://[xxxx:xxxx:- xxxx]
The IP address of the projector can be confirmed from [Network Setting] in the
[Installation] menu.The authentication window is displayed in the browser.
When you access for the first time, enter “root” as the user name and “Projector” as the password in the authentication window.
When you log in for the first time, the window that prompts you to change the password is displayed. Follow the instructions on the screen to change the password.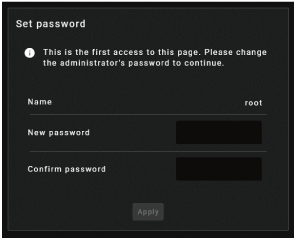
You can change the password from [Password] in the [Advanced Settings] page.
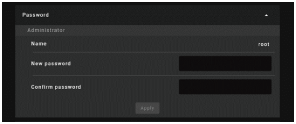
When you change the password, enter a new password.
The password should be 8 to 16 characters that includes both alphabet and numeric characters. Alphabets are case-sensitive.
The initial password “Projector” cannot be set as the new password.
Hint
- Once the network settings have been configured, the control window will be displayed only by performing Step 5 from the next time.
Note
- If you forget your password, contact qualified Sony personnel.
The password will be reconfigured with your permission.