Parts and Controls (Main Unit)
Front/Right Side
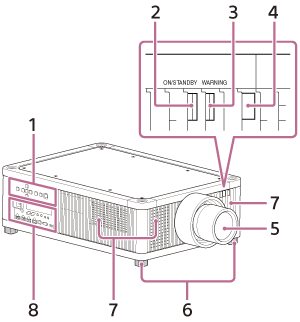
- Control panel
- ON/STANDBY indicator
- WARNING indicator
- Remote control detector
- Projection lens (not supplied)
- Feet (adjustable)
- Ventilation holes (intake)
- Terminals
Note
- If you look through the projection lens while the unit is projecting, the light may damage your eyes. Take special caution when using the unit around children.
Control panel and terminals
Control panel
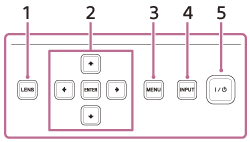
- LENS button
-
 /
/ /
/ /
/ (Up/Down/Left/Right)/ENTER (Enter) button
- MENU button
- INPUT button
-
 /
/ (On/Standby) button
Hint
- The buttons on the control panel of the main unit function in the same way as those on the remote control.
Terminals
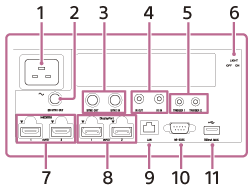
- AC IN socket
-
3D SYNC OUT terminal
Connects a 3D sync transmitter (not supplied). -
SYNC IN/SYNC OUT terminal
Not available for this unit. -
IR IN/IR OUT terminal
IR IN: Inputs signals to control the projector. When connecting to the terminal, the remote control detector does not work with the remote control.
IR OUT: Outputs the control signals received at the projector to the connected devices. When operating the projector with the remote control, the connected devices can also be operated simultaneously. - TRIGGER 1/TRIGGER 2 terminal
-
Terminal light switch
Turns on/off the terminal light. - HDMI 1/HDMI 2 terminal
- DisplayPort 1/DisplayPort 2 terminal
- LAN terminal
-
REMOTE terminal
Connects to a control system such as a computer for remote control. -
USB terminal
Terminal for software update.
Rear/Bottom
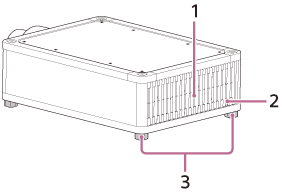
- Ventilation holes (exhaust)
- Remote control detector
- Feet (adjustable)