Parts and Controls (Remote Control) (RM-PJ29)
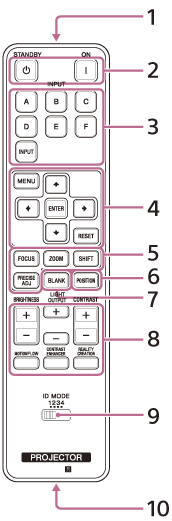
- Infrared transmitter
-
 (On)/
(On)/
 (Standby) button
Turns on the power and goes to standby. -
INPUT (Input selection) buttons
Changes the input terminal.
A: HDMI 1
B: HDMI 2
C: DisplayPort 1
D: DisplayPort 2
E: DisplayPort 1/2
F: Not available for this unit.
INPUT: Every time you press the button, the input terminal changes in order from A to E. -
 /
/ /
/ /
/ (Up/Down/Left/Right)/ENTER (Enter) button
MENU button
RESET button
Used for menu operations, etc. -
FOCUS/ZOOM/SHIFT button
Adjusts the lens focus, lens zoom, or lens shift.
The PRECISE ADJ button is not available for this unit. -
POSITION button
Stores and recalls lens settings. -
BLANK button
Temporarily turns off an image. Press again to release. -
BRIGHTNESS button
Adjusts the brightness of images.
LIGHT OUTPUT button
Adjusts the laser output from the light source.
CONTRAST button
Adjusts the contrast of images.
MOTIONFLOW button
Smoothly reproduces fast-moving images.
CONTRAST ENHANCER button
Automatically corrects images to optimize the contrast according to a scene.
REALITY CREATION button
Adjusts the definition of images and reduces the noise of images. -
ID MODE switch
Sets the ID mode of the remote control. If a different ID mode is assigned to each projector when multiple projectors are used, you can operate only the projector with the same ID mode as that of the remote control. -
IR output terminal
Used as a wired remote control by connecting to the IR IN terminal on the unit with a cable (stereo mini plug (not supplied)). You do not need to install batteries in the remote control.