Using the Picture Position
You can store up to five combinations of lens settings (focus, image size, image position), aspect ratio, and blanking. These settings can be recalled.
-
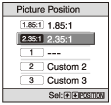
Press the POSITION button.
The Picture Position selection window appears.
The position where the lens settings are not stored is displayed as [---].

-
Press the POSITION button repeatedly to select the position.
The selected position is recalled.
You can also select the desired position by pressing the
 /
/ (Up/Down) button and the ENTER button.
Store or delete lens settings (focus, image size, image position) under [Picture Position] in the  [Screen] menu.
Adjust the aspect ratio or blanking under [Aspect] or [Blanking] in the  [Screen] menu.
Lens movement
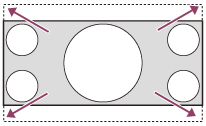
The following examples show that images with an aspect ratio of 1.78:1 (16:9) or 2.35:1 are projected on a 2.35:1 screen.
- When a 1.78:1 (16:9) image is input

- When a 2.35:1 image is input
When the POSITION button is pressed, the 2.35:1 image is expanded to fill the screen.

Note
- When the position has been selected and confirmed, the lens starts to move. Do not touch the lens and place anything near the lens. Doing so may cause injury or malfunction.
- If you press any button on the remote control or the control panel while the lens is moving, the lens stops. In that case, select the position again or adjust the lens manually.
- The Picture Position function is not guaranteed to reproduce the lens settings precisely.
- When you use multiple screen aspect ratios using the lens zoom, set the projector within the range of the specified projection distance in reference to the Projection distance list. Depending on the setting position, the range of the lens shift may be restricted, even though the projector is set within the specified range.

