Installing Sound Organizer 2 (for Windows only)
Install Sound Organizer 2 on a computer.
Note
-
Be sure to install Sound Organizer 2 on the computer that has already Sound Organizer (Ver. 1.6) installed as well.
-
When installing Sound Organizer 2, log in to an account with administrator privileges.
Also, if you are using Windows 7/Windows 8.1 and the [User Account Control] window appears, confirm the contents of the window and then click [Yes].
-
Installing Sound Organizer 2 adds the Windows Media Format Runtime module. The added Windows Media Format Runtime module will remain if you uninstall Sound Organizer 2. If Windows Media Format Runtime is preinstalled, however, the module may not be installed.
-
Uninstalling Sound Organizer 2 does not delete data in the contents storage folders.
-
If you have a computer that has multiple Windows operating systems installed, do not install Sound Organizer 2 on each of the operating systems to avoid possible data inconsistencies.
- Connect your linear PCM recorder to the computer.
- Start Explorer on the computer.
For Windows 7
Go to the [
 Start] menu at the bottom left corner of the desktop, and then click [All Programs] - [
 Accessories] - [Windows Explorer].
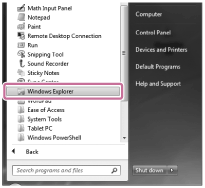
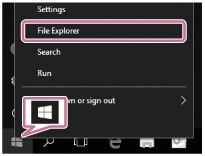
For Windows 8.1/Windows 10
Right-click at the bottom left corner of the desktop, and then click [File Explorer] on the menu.
The appearance of the windows on the computer screen varies depending on your Windows version.
-
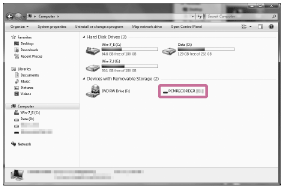
Double-click [PCMRECORDER] - [FOR WINDOWS].
-
Double-click [SoundOrganizer_V2001] (or [SoundOrganizer_V2001.exe]).
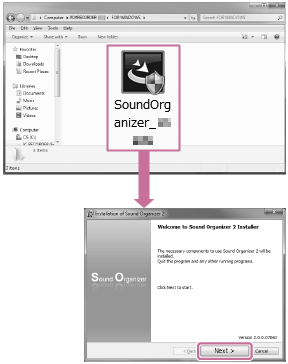
Depending on the version of your operating system, the setup preparation process (file extraction) may start automatically without showing any notice.
In such a case, follow the on-screen instructions.
-
When the [Welcome to Sound Organizer 2 Installer] window appears, click [Next].
-
Make sure that you accept the terms of the license agreement, select [I accept the terms in the license agreement], and then click [Next].
-
When the [Setup Type] window appears, select [Standard] or [Custom], and then click [Next].If you have selected [Custom], follow the on-screen instructions.
- When the [Ready to Install the Program] window appears, click [Install].Installation starts.
- When the [Sound Organizer 2 has been installed successfully.] window appears, make sure that [Launch Sound Organizer 2 Now] is selected, and then click [Finish].
Note
- You may need to restart the computer after you installed Sound Organizer 2.
The contents of the Help Guide may be subject to change without notice due to updates to the product's specifications.