Shooting photos
Shoot photos.
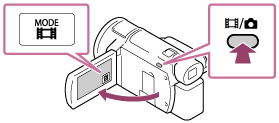
- Open the LCD monitor of this product to turn the power on.
- You can also turn on this product by pressing
 (ON/STANDBY) button or by pulling out the viewfinder (models with the viewfinder).

- You can also turn on this product by pressing
- Press the
 /
/ (Shooting Mode) button to select the photo recording mode (models with the viewfinder).
- You can also select the photo recording mode by selecting [MODE] on the LCD monitor.
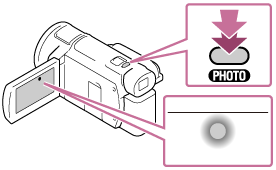
- Press PHOTO lightly to adjust the focus, then press it fully.
- When the focus is adjusted properly, the AE/AF lock indicator appears on the LCD monitor.
Note
-
You cannot shoot photos in the following situation(s):
- When [
 File Format] is set to [
 XAVC S 4K] and [
REC Mode] is set to [100Mbps
XAVC S 4K] and [
REC Mode] is set to [100Mbps ].
]. - When [
SteadyShot] is set to [Intelligent Active].
- When [Picture Effect] is set to other than [Off].
- When [
File Format] is set to [
 AVCHD] and [
Frame Rate] is set to [60p] (1080 60i-compatible device)/[50p] (1080 50i-compatible device).
AVCHD] and [
Frame Rate] is set to [60p] (1080 60i-compatible device)/[50p] (1080 50i-compatible device). - When [
File Format] is set to [
AVCHD] and [
REC Mode] is set to [Highest Quality
 ].
].
- When [
- The following states will be indicated if data is still being written onto the recording media after recording has finished. During this time, do not apply shock or vibration to this product, or remove the battery pack or AC Adaptor.
- Access lamp is lit or flashing
- The media icon in the upper right of the LCD monitor is flashing