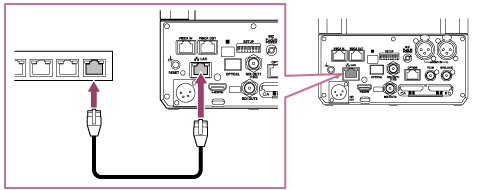
Connecting the Unit to a Network Device Via Wired Connection
This topic describes connecting the unit to a network device via a wired connection.
-
Connect the unit to a network device (such as a Wi-Fi access point or switching hub) using a Category 5e or higher LAN cable.

-
Access the Web App and configure the initial settings of the unit.
For details, see “Accessing the Web App from a Web Browser” and “Initializing the Unit.”
Connecting to a network without a DHCP server
The unit is configured by factory default to obtain an IP address automatically from a DHCP server.
In general, commercially available Wi-Fi routers are equipped with a DHCP server function. However, if connecting to a network that does not have a DHCP server, set a fixed IP address using the following procedure.
- Remove the power supply from the unit.
- Set SETUP switch 8 to the ON position on the connector block (fixed IP address mode).

- Connect the power supply to the unit.
The IP address of the unit will be set to 192.168.0.100, regardless of the IP address setting in the web menu. - Set the IP address of the setup computer to a unique address on the same network, such as 192.168.0.200.
- Connect the setup computer and unit directly using a LAN cable.
- On the setup computer, enter “192.168.0.100” in the address bar of a web browser
The Web App of the unit is displayed. You will be prompted to enter the user name and password. Configure settings as described in “Initializing the Unit.” - Configure the following in [Network] – [Wired LAN] – [IPv4] in the web menu and press the [OK] button.
The settings are examples only. Change the settings according to the network to connect.Item Setting Remarks [DHCP] [Off] [IP Address] 192.168.0.101 The last segment should be a number that is unique among other devices connected to the same network. [Subnet Mask] 255.255.255.0 [Gateway] 192.168.0.1 Configure the settings according to the network. - Wait about 10 seconds and then remove the power supply from the unit.
- Set SETUP switch 8 to the OFF position on the connector block.
- Reconnect the unit to the network LAN cable.
- Connect the power supply to the unit.
- Enter the IP address configured in step 7 in a web browser connected to the network.
The Web App screen appears.
TP1001804472

