Operations on Recorded Clips
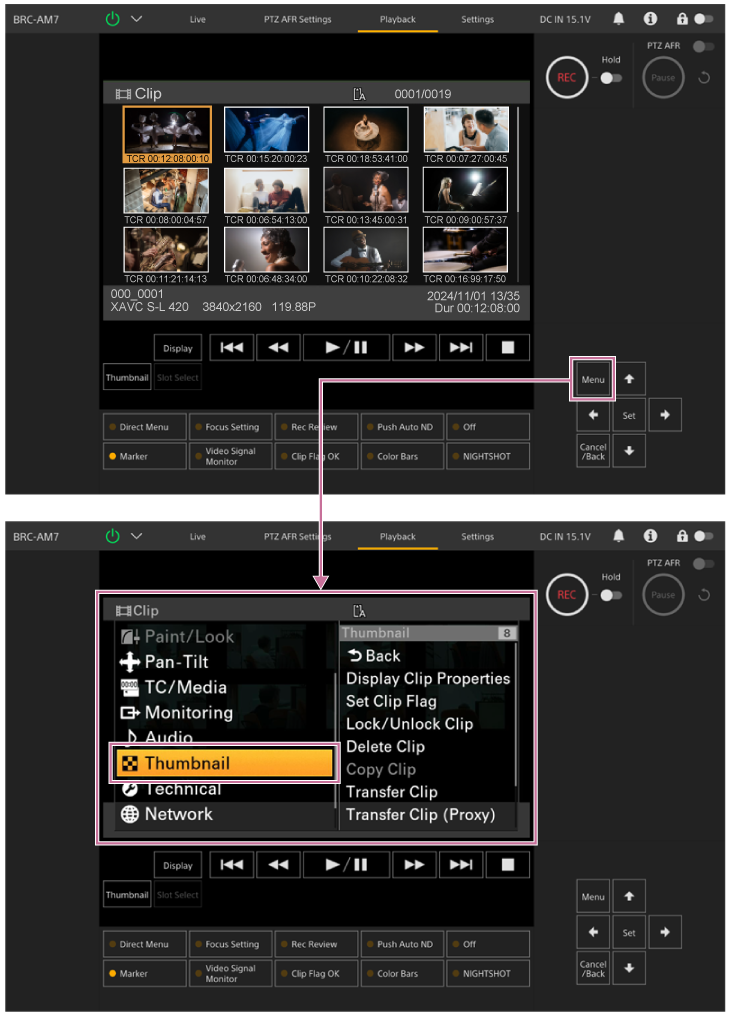
On the thumbnail screen, you can operate the clips or check clip properties using the [Thumbnail] menu in the camera menu.
Press the [Menu] button on the playback operation screen to display the camera menu in the camera image panel.
You can perform the following operations using the [Thumbnail] menu in the camera menu.

Hint
- You can also press the [Menu] button on the live operation screen to display the camera menu.
Operations using the [Thumbnail] menu in the camera menu
Select a function to operate using the arrow buttons in the GUI control panel and press the [Set] button.
Press the [Cancel/Back] button to return to the previous screen.
Note
- Some items cannot be selected, depending on the state when the menu was displayed.
Menu items for clip operations
The [Thumbnail] menu in the camera menu has the following menu items related to clip operations.
[Display Clip Properties]
[Set Clip Flag]
[Lock/Unlock Clip]
[Delete Clip]
[Copy Clip]
[Transfer Clip]
[Transfer Clip (Proxy)]
[Filter Clips]
[Customize View]
- For details about each menu item, see “Thumbnail Menu.”
To display the clip properties screen
Select [Thumbnail] – [Display Clip Properties] in the camera menu to display the clip properties screen.
Press the  (Previous) button or
  (Next) button to jump to the previous/next clip.
To add clip flags
You can add clip flags (OK, NG, or KP marks) to clips to filter the display of clips based on the clip flags.
Select the thumbnail for the clip to which you want to add a clip flag, then select the clip flag using [Thumbnail] – [Set Clip Flag] in the camera menu.
| Setting | Added clip flag |
|---|---|
| [Add OK] | OK |
| [Add NG] | NG |
| [Add KEEP] | KP |
Hint
- During playback, you can also use an assignable button assigned with the clip flag function to add clip flags.
To display the filtered clip thumbnail screen
Select [Thumbnail] – [Filter Clips] in the camera menu and select a clip flag type to display only those clips that have the specified flag.
To display all clips, select [All].
You can also press the [Display] button to sort the thumbnail display by flags.
To delete clips
You can delete clips from memory cards.
Select [Thumbnail] – [Delete Clip] – [Select Clip] or [All Clips] in the camera menu.
[Select Clip]: Deletes the selected clip. Multiple clip selection is supported.
[All Clips]: Deletes all of the displayed clips.
To copy clips
You can copy clips to another memory card.
Clips are copied to the destination memory card with the same clip names.
Select [Thumbnail] – [Copy Clip] – [Select Clip] or [All Clips] in the camera menu.
[Select Clip]: Copies the selected clip. Multiple clip selection is supported.
[All Clips]: Copies all clips on the same memory card to another memory card.
Note
- If a clip with the same name already exists on the copy destination memory card, the clip will be copied with a name formed by incrementing the number portion of the original clip name.
Example: ABCD0002 → ABCD0003 - A message appears if the remaining capacity of the copy destination memory card is insufficient. Replace the copy destination memory card.
- When copying a memory card on which multiple clips are recorded, it may not be possible to copy all clips even if the capacities of the memory cards are the same, depending on the usage conditions and memory characteristics.
To change the information displayed on the thumbnail screen
You can change the clip/frame information displayed below the thumbnail.
Select [Thumbnail] – [Customize View] – [Thumbnail Caption] in the camera menu and select the information to display.
[Date Time]: Displays the date and time the clip was created and last modified.
[Time Code]: Displays the timecode.
[Duration]: Displays the duration of the clip.
[Sequential Number]: Displays a sequential number on each thumbnail.

