Configuring PTZ Auto Framing Initial Settings (“Person” mode)
This topic describes how to configure PTZ auto framing initial settings.
This topic describes “Person” mode settings. For details about “Ball Sports (Basketball)” mode settings, see “Tracking Ball Sports (Basketball) Automatically from an Elevated Position.”
When [PTZ AFR File] is selected, you can also load PTZ auto framing settings from other cameras. For details, see “Saving and Loading PTZ Auto Framing Configuration Data.”
-
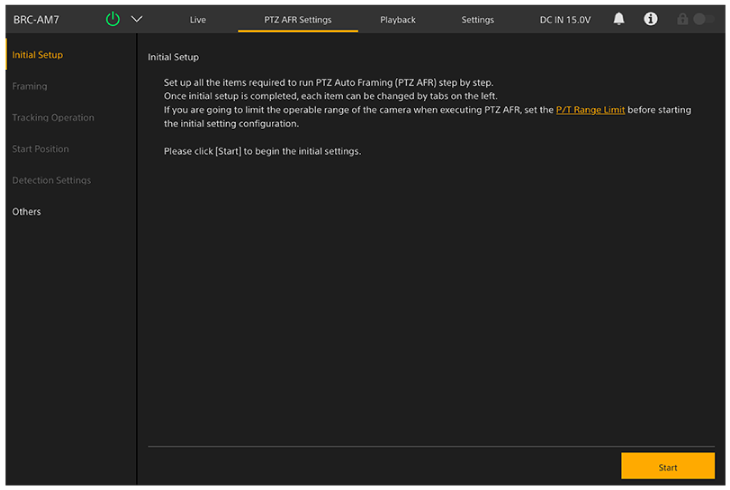
Press the [PTZ AFR Settings] tab.
The [Initial Setup] screen of the PTZ AFR settings screen appears.
-
Check the description on the screen and press the [Start] button.
Hint
- The [Start] button is displayed only when configuring settings for the first time.
Configuration of the PTZ auto framing settings starts.
-
Select [Person] on the [Framing Mode] screen.
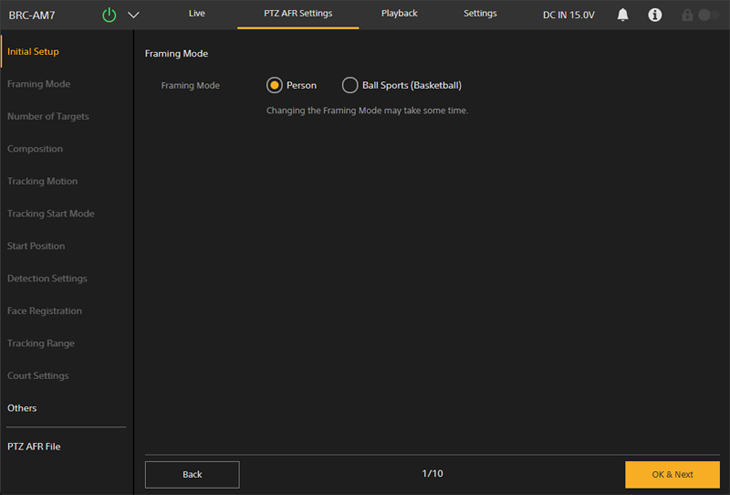
- [Person]: Framing target is a person.
- [Ball Sports (Basketball)]: Framing target is a ball sports (basketball).
For details about when [Ball Sports (Basketball)] is selected, see “Tracking Ball Sports (Basketball) Automatically from an Elevated Position.”
-
Press the [OK & Next] button.
Note
- If you change the framing mode, you may not be able to change the framing mode again or turn on PTZ framing for several tens of seconds. In that case, wait a while and try again.
-
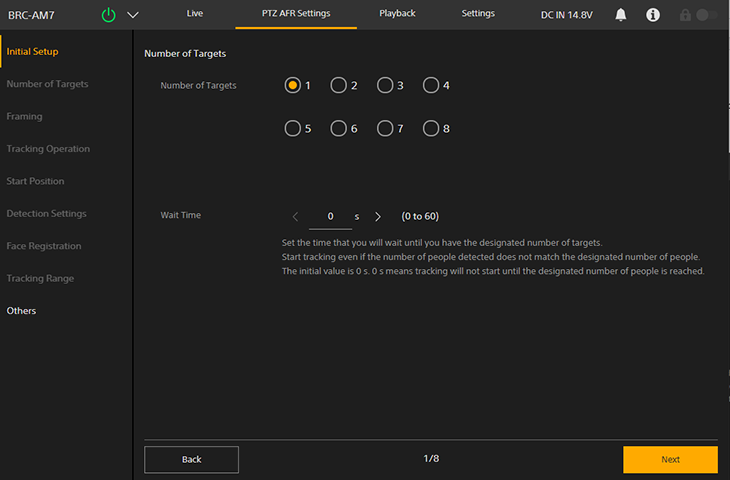
Set the number of people as the tracking target on the [Number of Targets] screen.
- [Number of Targets]: Sets the number of people to track during PTZ auto framing. The number of people to track can also be changed on the
 (PTZ AFR1) tab of the live operation screen during PTZ auto framing.
 - [Wait Time]: Sets the time to wait until the specified number of people to track are gathered at the start position in auto tracking start mode. Tracking starts regardless of this value when in manual tracking start mode.
Hint
- You can also set the number of people to track at any time on the live operation screen.
- [Number of Targets]: Sets the number of people to track during PTZ auto framing. The number of people to track can also be changed on the
-
When finished configuring, press the [Next] button.
-
Adjust the desired PTZ auto framing composition on the [Composition] screen.
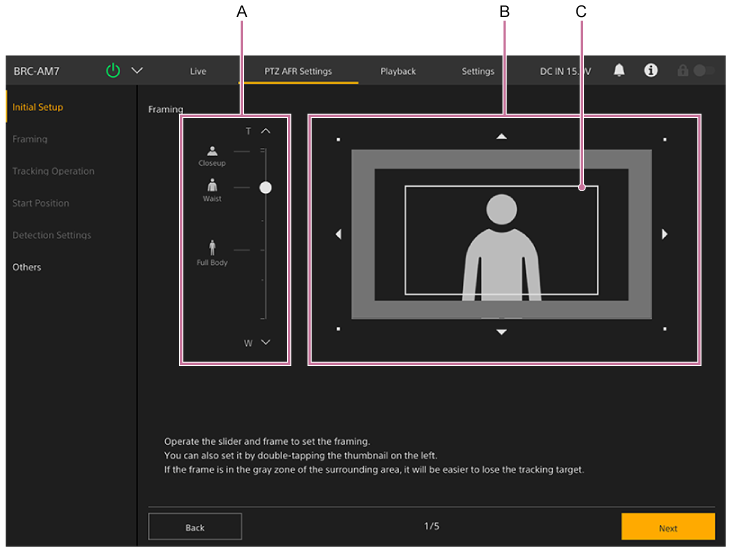
A: Human body size slider
B: Composition adjustment panel
C: Composition frame
Adjust the size and position of the person within the image.
- [Lead Room Effect]: Sets the strength of the effect that creates white space in the composition according to the orientation of the face.
Hint
- Double-tapping an icon on the left side of the human body size slider will set the composition frame to the size (zoom ratio) and position of the person for that icon.
Note
- If the white composition frame overlaps the gray zone, it will be easy to lose people moving in the opposite direction.
- If you compose your shot so that the person is large, it will be easy to lose people if they move quickly. In this case, make the person smaller and position them so that there is enough room to move around.
-
When finished configuring, press the [Next] button.
The next setup screen appears.
-
Set the auto control scope for PTZ auto framing, and the speed and sensitivity during tracking on the [Tracking Motion] screen, as required.
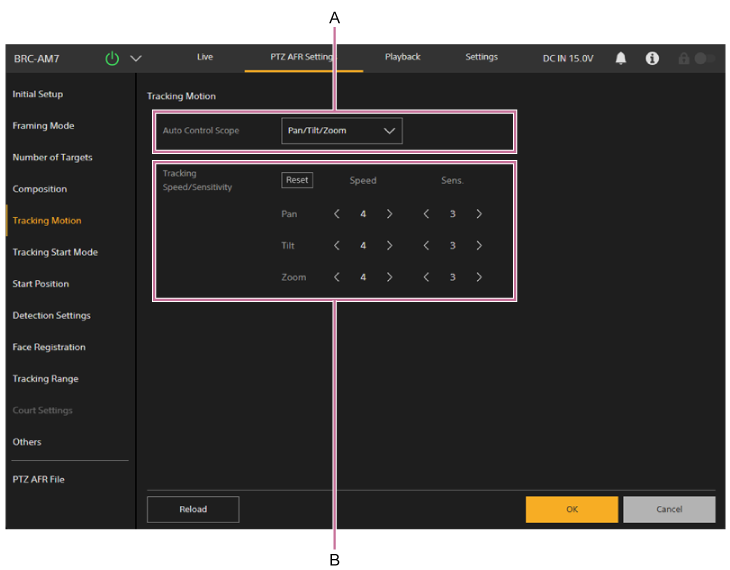
A: Auto control scope setup panel
Select the auto control scope for PTZ auto framing from the following:
- [Pan/Tilt/Zoom]: Control pan/tilt/zoom.
- [Pan/Tilt]: Control pan/tilt.
- [Pan]: Control pan.
B: Speed and sensitivity setup panel
Set the speed and sensitivity of PTZ auto framing. For details, see the following hints.
- [Reset] button: Press the button to restore the speed and sensitivity to the default values.
- [Speed]: Set separate speeds for pan/tilt/zoom to one of five steps (1 (slow) to 5 (fast)).
- [Sens.]: Set separate sensitivities for pan/tilt/zoom to one of six steps (0 to 5 (responsive)). When set to 0, the pan/tilt/zoom move until the specified composition is achieved, and once achieved the pan/tilt/zoom do not move.
Hint
- When the auto control scope for PTZ auto framing is set to [Pan/Tilt] or [Pan], tracking continues, without pausing, even when you operate the zoom using the framing control panel of the Web App or the remote control.
- The speed sets the level of acceleration or deceleration when tracking a subject. The sensitivity sets how sensitive the camera is to detecting deviations from the configured composition.
- If a subject is not moving quickly (such as in a presentation), reducing the speed will result in smoother tracking.
- If a subject is moving quickly (such as in sports), increasing the sensitivity/speed will make it less likely to lose the subject.
- If extracting and using an image in a subsequent system, increasing the pan/tilt sensitivity will make it less likely for the subject to be cropped out.
- If a subject is not moving back and forth (for example, when sitting), reducing the zoom sensitivity will reduce fluctuations in the framing and increase stability.
Note
-
Framing may become unstable if you increase the speed or sensitivity in the following cases.
- Part of the subject is obscured.
- There are many people around the subject.
- Subject is in a complex pose.
-
Press the [Next] button.
The next setup screen appears.
-
Set the tracking mode on the [Tracking Start Mode] screen.
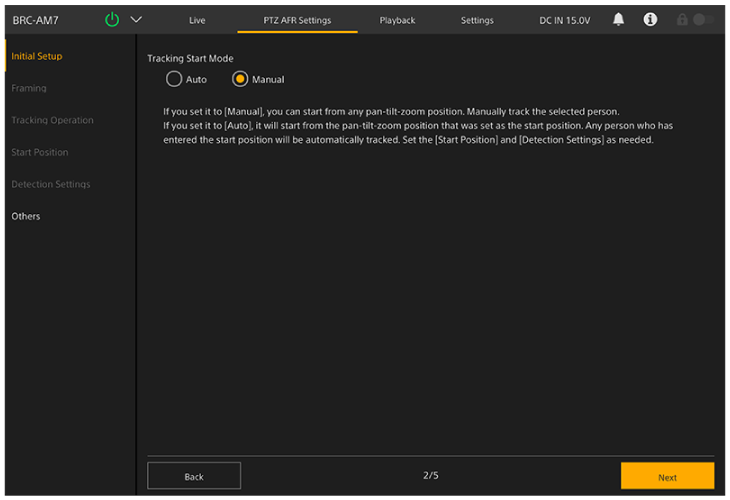
Sets the tracking start mode.
- [Auto]: In this mode, tracking a person automatically starts when a person enters the specified detection area in the field of view configured for the start position (auto tracking start mode). When this setting is selected, configuration on the [Start Position] screen and [Detection Settings] is required.
- [Manual]: In this mode, tracking does not start until you manually specify the person to track (manual tracking start mode).
-
When finished configuring, press the [Next] button.
The next setup screen appears.
- When [Auto] is selected, go to step 13.
- When [Manual] is selected, go to step 19.
-
Set the start position for auto tracking on the [Start Position] screen.
Configure the start position used when PTZ auto framing is in auto tracking start mode. This setting is not required for manual tracking start mode.
The camera will return to the start position when you press the
 (Restart) button on the live operation screen or if tracking of the person you were tracking is lost.
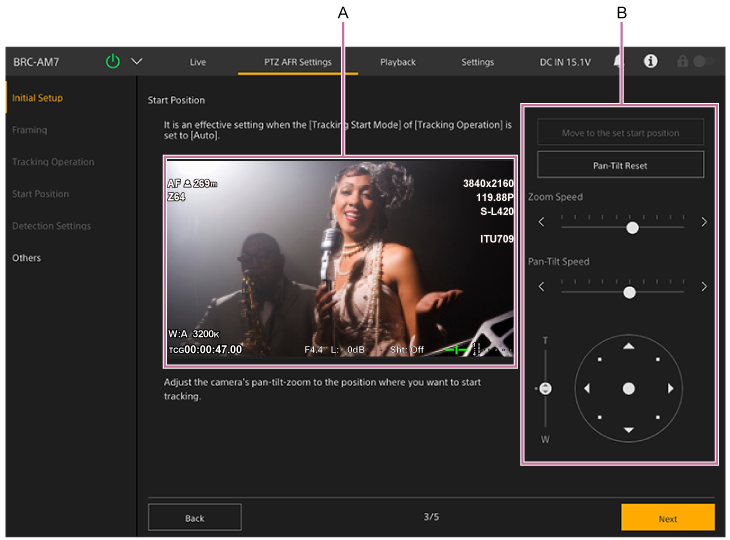
A: Camera image panel
B: Framing control panel
Set the start position using the framing control panel to pan, tilt and zoom the camera image while monitoring the camera image in the camera image panel. You can adjust the pan/tilt and zoom transition speed using the sliders.
- By default, the [Move to the set start position] button is disabled. It is enabled after the initial configuration is completed. Press it to move to the currently configured start position.
- Press the
 (Reset) button to reset the pan/tilt. Press the button when the POWER lamp and NETWORK lamp are blinking simultaneously or when [Execute Pan-Tilt Reset.] is displayed in the framing control panel.
Note
- Reconfiguration will be required in the following cases.
- When [Rec Format] – [Video Format] is changed from 1920×1080 to 3840×2160 during Clear Image Zoom operation
- When the [Zoom Type] setting is changed
- When the [Tele Convert] setting is changed
- When [S&Q Motion] – [Frame Rate] is set to a value exceeding 60fps
- When [P/T Range Limit] is changed
- When [P/T Direction] – [Direction] – [Ceiling] is changed
- When the [Tracking Range] setting is changed
-
When finished configuring, press the [Next] button.
The next setup screen appears.
-
Set the detailed settings related to auto tracking start on the [Detection Settings] screen.
This setting is not required for manual tracking start mode.
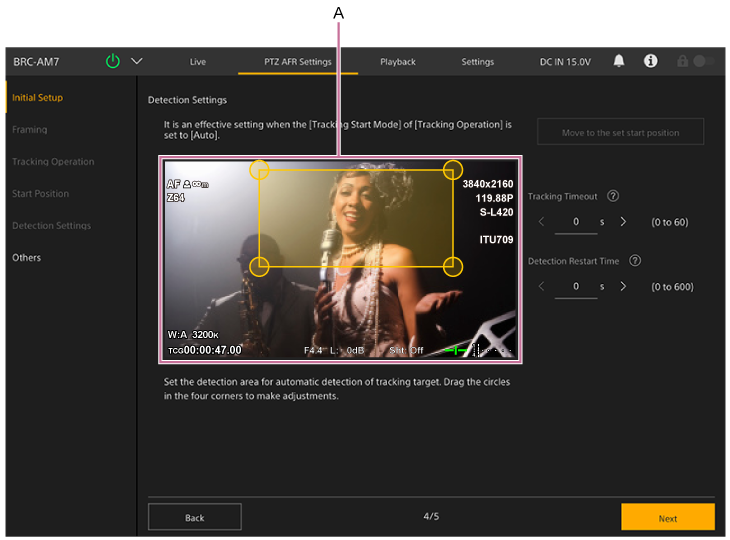
A: Detection range setup panel
Sets the range for detecting the target person to track.
Set the tracking range by dragging the circles on the four corners of the orange frame in the detection range setup panel while monitoring the camera image. A person entering this range will become the target for auto tracking.
When [Frame/Area Indicator] is set to the on position on the [Others] screen, the detection area for the start position is displayed as a dashed line.
- [Move to the set start position] button
Disabled by default. It is enabled after the initial configuration is completed. Press it to move to the currently configured start position. - [Detection Part]
Tracking starts when the configured body part enters the detection area. You can set the body part to [Head] or [Ankle]. - [Registered Face Tracking]
Tracking starts automatically when a face registered beforehand is detected. When enabled, you can register face data on the [Face Registration] screen. Tracking does not start if there is no face data registered in [Registered Face Data]. - [Tracking Timeout]
Sets the time for returning to the start position if detection of the tracking target face is lost. Set to 0 seconds to disable the timeout function (default value: 0 seconds). This sets the time before the camera automatically stops tracking a person whose face is not visible, such as a spectator facing away from you that may mistakenly become the tracking target, and returns to the start position. - [Detection Restart Time]
Sets the time between when auto tracking starts until it restarts automatically. Set to 0 seconds to disable the auto restart function (default value: 0 seconds). If you want to switch the tracking target regularly while shooting, rather than tracking only a specific person, you can set a time interval for automatically restarting tracking to stop the current tracking automatically.
Note
- Reconfiguration will be required if the start position setting is changed.
- If the camera shifts tracking to a person with a similar face, if tracking suddenly stops, or if unintended behavior occurs, turning off [Registered Face Tracking] may improve the situation.
- [Move to the set start position] button
-
When finished configuring, press the [Next] button.
The next setup screen appears.
-
Register face data on the [Face Registration] screen.
This setting is not required for manual tracking start mode.
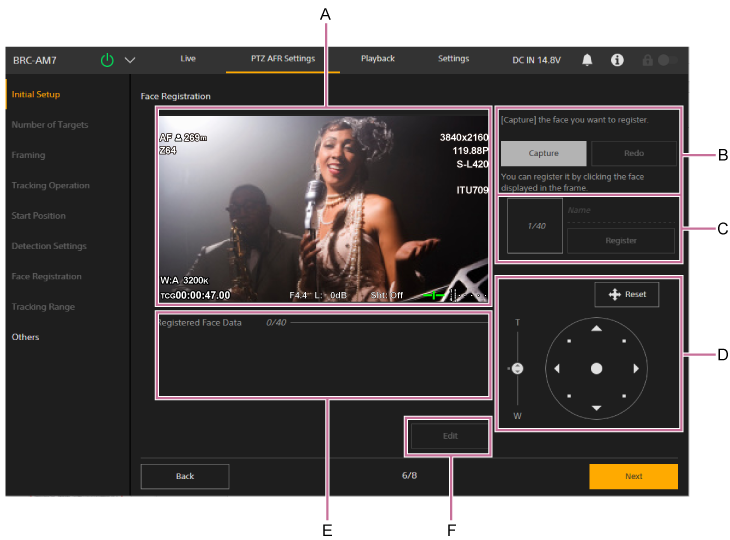
- A: Image display area
Displays the current camera image. You can register the faces shown in the image. - B: [Capture] / [Redo] button
When you press the [Capture] button, the image freezes and a face frame is displayed around faces that can be registered. When a face displaying a face frame is clicked, the face image is imported into the face registration panel.
If there are no face frames displayed for faces you want to register, press the [Redo] button to unfreeze the image ready for recapture. - C: Face registration panel
Displays the captured face image. Enter a name and press the [Register] button to register the face.
Up to 40 face data can be registered. - D: Framing control panel
Operate the pan, tilt, and zoom to adjust the capture framing. Adjust the framing so that the target whose face you want to register is displayed in the image display area.- Press the (Reset) button to reset the pan/tilt. Press the button when the POWER lamp and NETWORK lamp are blinking simultaneously or when [Execute Pan-Tilt Reset.] is displayed in the framing control panel.
- Press the
- E: [Registered Face Data]
Displays the registered face data in order of priority. - F: [Edit] button
You can press the [Edit] button to display the edit screen to delete, rename, or change the priority of registered face data. To delete, press the (Delete) button for the face data you want to delete. Press the [OK] button to apply the edits.
Note
- Do not perform face registration operations from multiple web browsers at the same time.
- Faces may not be registered or the full effectiveness of the face recognition function may not be obtained if any of the following conditions exist.
- Face is not looking toward the front.
- Face is obscured (sunglasses, mask, etc.).
- Image appears extremely large or small.
- Face is near the edge of the image.
- Facial expression has extreme changes (eyes closed, mouth wide open, angry, etc.).
- Immediately after pressing the [Capture] button, the camera screen display of streaming and video output disappears temporarily.
- Set a face image name comprising up to 16 bytes.
- The following characters cannot be used in face image names.
" % & , : ~
- A: Image display area
-
When finished configuring, press the [Next] button.
-
Set the people tracking range on the [Tracking Range] screen.
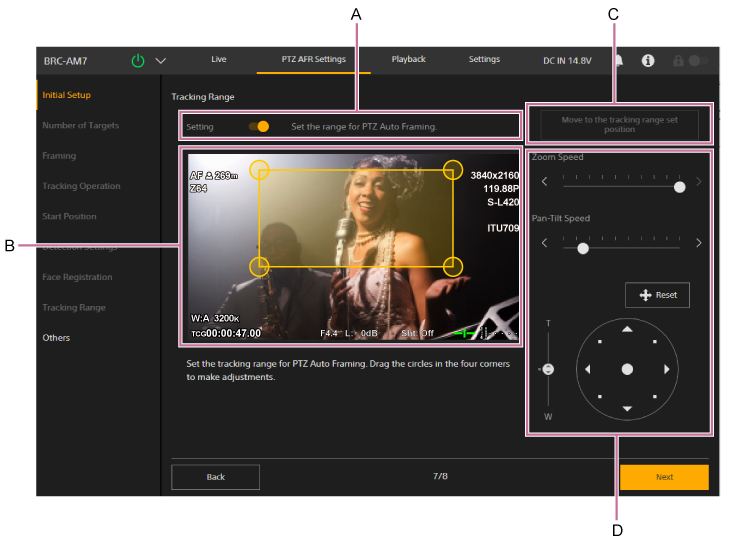
Set the tracking range of people during PTZ auto framing.
- A: [Setting]
Set to on to enable [Tracking Range] to display the tracking range setup panel, [Move to the tracking range set position], and the framing control panel. - B: Tracking range setup panel
Set the tracking range by dragging the circles on the four corners of the orange frame in the tracking range setup panel while monitoring the camera image. Subjects can only be tracked within this range, and tracking will stop if subjects are outside this range.
When [Frame/Area Indicator] is set to the on position on the [Others] screen, the tracking range is displayed as a solid line on the live operation screen. - C: [Move to the tracking range set position]
- D: Framing control panel
Operate the pan, tilt, and zoom to adjust the framing for the tracking range. You can adjust the speed of pan/tilt and zoom separately.- Press the (Reset) button to reset the pan/tilt. Press the button when the POWER lamp and NETWORK lamp are blinking simultaneously or when [Execute Pan-Tilt Reset.] is displayed in the framing control panel.
- Press the
Note
- If [Tracking Range] is configured such that it does not include the start position detection area, auto detection will not occur. Configure [Tracking Range] such that it does include the detection area.
- Reconfiguration will be required in the following cases.
- When [Rec Format] – [Video Format] is changed from 1920×1080 to 3840×2160 during Clear Image Zoom operation
- When the [Zoom Type] setting is changed
- When the [Tele Convert] setting is changed
- When [S&Q Motion] – [Frame Rate] is set to a value exceeding 60fps
- When [P/T Direction] – [Direction] – [Ceiling] is changed
- A: [Setting]
-
When finished configuring, press the [Next] button.
-
Configure other settings on the [Others] screen.
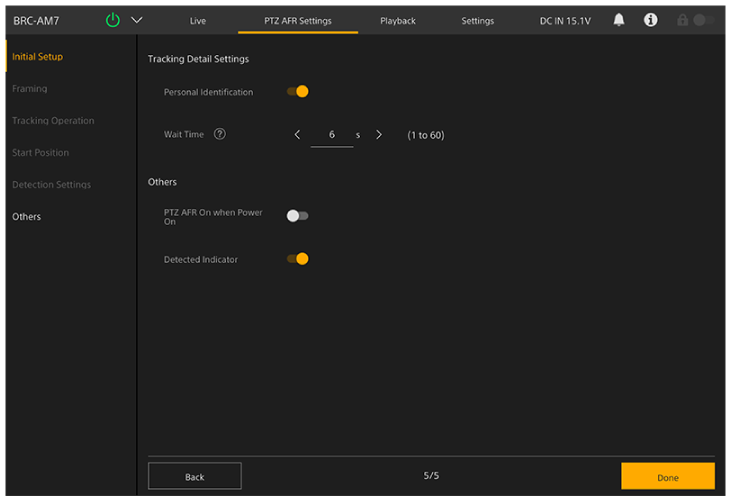
Configure the following settings, as required.
- [Personal Identification]: Set to the on position for normal operation. Set to the off position if you want the camera to automatically track someone at all times without identifying them. Enabled only in “Person” mode.
- [Wait Time]: Set the time to stop pan/tilt/zoom operation and wait when the tracking target is lost. Enabled only in “Person” mode.
- [PTZ AFR On when Power On]: Set to the on position to start with PTZ auto framing enabled when the unit is turned on.
- [Frame/Area Indicator]: Set to the on position to display a frame around a detected person’s face as a target or candidate for auto tracking. It also displays the detection range for the start position and the tracking range on the live operation screen.
Hint
- If the camera shifts tracking to a person with a similar face, if tracking suddenly stops, or if unintended behavior occurs, turning off [Personal Identification] may improve the situation.
-
When finished configuring, press the [Done] button.
The following completion screen appears.
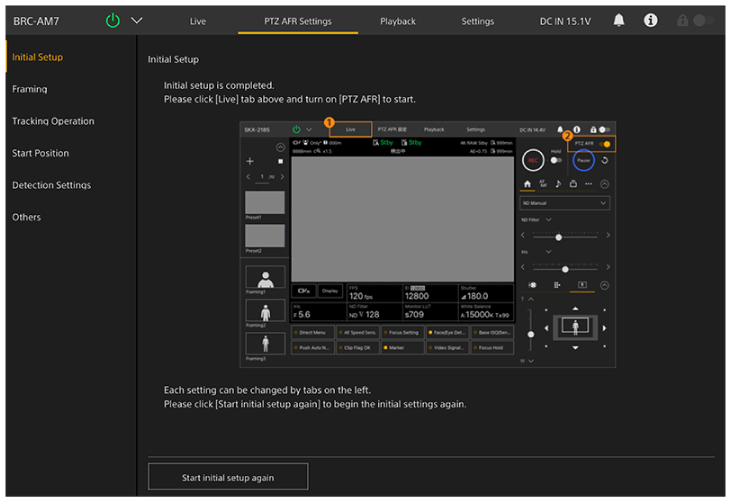
Configuration of the PTZ auto framing initial settings is completed.
Once you have completed the initial setup, you can open each page individually from the items on the left side of the PTZ AFR settings screen. If any settings are changed, press the [OK] button on each page to apply the settings.