Help Guide
Color Video Camera
BRC-AM7
JavaScript is disabled.
Please enable JavaScript and reload the page.
Back
Back to Top
Print
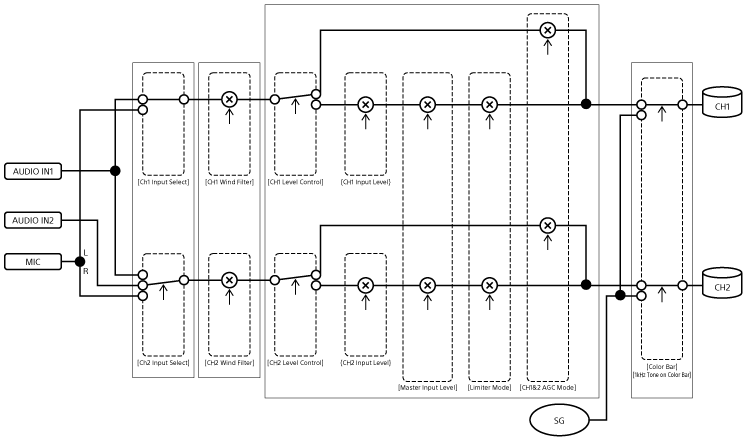
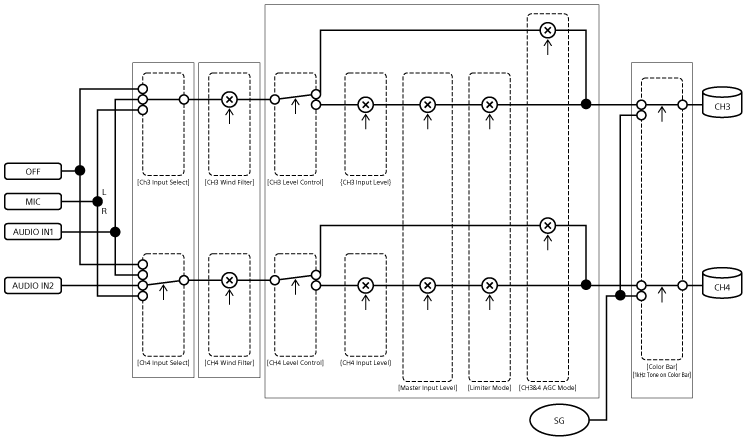
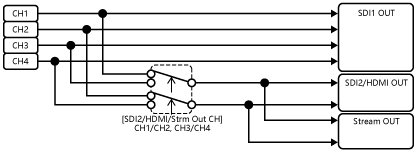
Block Diagrams
Audio Input
Audio Output
Go to Page Top
TP1001804721
Overview
Typical Usage Applications
System Configuration
Controlling a Single Unit Using the Supplied Infrared Remote Control
Controlling a Single Unit Using a Tablet or Computer
Controlling a Single Unit Using an External Remote Controller
Controlling Multiple Units Using an External Remote Controller
Location and Function of Parts
Front View
Connector Block
Side View
Bottom View
Location and Function of Parts of the Infrared Remote Control (supplied)
Web App Screen
Web App Screen Overview
Structure of Common Area of Screens
Structure of the Live Operation Screen
Structure of the PTZ AFR Settings Screen
Structure of the Playback Operation Screen
Structure of the Settings Screen
Camera Menu
Camera Screen Display
Preparation
Mounting the Unit
Mounting Upright in a Fixed Location
Mounting Upright in a High, Fixed Location
Mounting on a Ceiling
Connecting Cables
Connecting the Unit to a Network Device Via Wired Connection
Connecting to the Unit using a Remote Controller (Option) via RS-422
Connecting a Power Supply
Using DC Power
Using PoE++ Power
Resetting the Pan/Tilt
Configuring Before Shooting
Initializing the Unit Using the Web App
Accessing the Web App from a Web Browser
Initializing the Unit
Resetting Unit Settings
Configuring Basic Operation
Preparing Memory Cards
Memory Cards
Recommended Memory Cards
Inserting Memory Cards
Ejecting a Memory Card
Formatting (Initializing) Memory Cards
Checking the Remaining Recording Time
Restoring Memory Cards
Shooting
Basic Operation
Starting/Stopping Recording
Switching Between Memory Cards
Checking the Audio
Specifying Time Data
Reviewing the Recording (Rec Review)
Adjusting the Framing
Framing Adjustment Screen
Adjusting the Shooting Direction
Adjusting the Shooting Direction Using the Web App
Setting the Pan/Tilt Operating Speed
Setting the Pan/Tilt Operation Acceleration
Adjusting the Shooting Direction Using the Supplied Infrared Remote Control
Adjusting the Zoom
Setting the Zoom Type
Setting Tele Convert
Adjusting the Zoom Using the Web App
Setting the Zoom Operating Speed Using the Web App
Adjusting the Zoom Using the Supplied Infrared Remote Control
Saving/Restoring the Camera Pan/Tilt/Zoom Position
Saving/Restoring Pan/Tilt, Zoom Position, and Focus Setting Using the Web App
Renaming a Preset Position Using the Web App
Replacing a Saved Preset Position with a New Position Using the Web App
Deleting a Saved Preset Position Using the Web App
Synchronizing the Pan/Tilt Operation and Zoom/Focus Operation When Restoring a Preset Position
Changing the Transition Speed (Pan-Tilt/Zoom/Focus) When Restoring a Preset Position
Changing the Transition Time (Pan-Tilt/Zoom) When Restoring a Preset Position
Starting Auto Tracking of a Person after Restoring a Preset Position
Restoring PTZ Auto Framing Settings After Restoring a Preset Position
Saving/Restoring Pan/Tilt and Zoom Position Using the Supplied Infrared Remote Control
Automatic Camera Framing (PTZ Auto Framing)
About PTZ Auto Framing
Web App Screen Display During PTZ Auto Framing
Configuring PTZ Auto Framing Initial Settings (“Person” mode)
Specifying the Subjects for Automatic Tracking (Person manual tracking start mode)
Selecting Subjects in a Specified Position and Tracking Automatically (Person auto tracking start mode)
Tracking Ball Sports (Basketball) Automatically from an Elevated Position
Recalling a Preset Framing for PTZ Auto Framing
Renaming a Preset Framing for PTZ Auto Framing
Editing Preset Framing for PTZ Auto Framing
Replacing a Preset Framing for PTZ Auto Framing with a New Composition
Resetting a Preset Framing for PTZ Auto Framing
Changing the Number of People to Track During PTZ Auto Framing
Changing the Auto Control Scope for PTZ Auto Framing and the Speed/Sensitivity During Tracking
Saving and Loading PTZ Auto Framing Configuration Data
Saving a PTZ AFR File
Loading a PTZ AFR File
PTZ Auto Framing Using the Supplied Infrared Remote Control
Checking the PTZ Auto Framing Status Remotely
Adjusting the Focus
Focus Adjustment Screen
Adjusting the Focus Manually (Manual Focus)
Adjusting the Focus Manually Using the Web App
Adjusting the Focus Manually Using the Supplied Infrared Remote Control
Focusing by Specifying a Focus Position (Spot Focus)
Using Auto Focus Temporarily (Push Auto Focus (AF))
Adjusting the Focus Automatically (Auto Focus)
Adjusting the Focus Automatically Using the Web App
Adjusting the Focus Automatically Using the Supplied Infrared Remote Control
Setting the Auto Focus Area/Position (Focus Area)
Changing the Focus Area Quickly (Focus Setting)
Moving the Focus Area Frame Using Touch Operation (Touch Focus Area)
Adjusting the Auto Focus Operation (AF Transition Speed, AF Subject Shift Sensitivity)
Setting the Auto Focus Target Manually (AF Assist) Using the Web App
Focusing Manually During Auto Focus Using the Supplied Infrared Remote Control
Using Manual Focus Temporarily During Auto Focus (Push Manual Focus)
Detecting and AF Tracking a Person
AF Tracking a Specified Subject (Realtime Tracking AF)
Notes on Shooting
Adjusting the Flange Focal Distance
Adjusting the Brightness
Brightness Adjustment Screen
Setting the Target Level for Automatic Brightness Adjustment
Adjusting the Iris
Adjusting the Iris Automatically
Adjusting the Iris Manually
Adjusting the Gain
Adjusting the Gain Automatically
Adjusting the Gain Manually
Adjusting the Shutter
Adjusting the Shutter Automatically
Adjusting the Shutter Manually
Adjusting the Light Level (ND Filter)
About the ND Filter
Adjusting in Preset Mode
Adjusting Automatically in Variable Mode
Adjusting Manually in Variable Mode
Adjusting for Natural Colors (White Balance)
White Balance Adjustment Screen
Adjusting the White Balance Automatically
Adjusting the White Balance Manually
Running Auto White Balance
Configuring Image Stabilization
Using Image Stabilization
Configuring the Audio to Record
Audio Configuration Screen
Selecting the Audio Input Device
Adjusting the Audio Recording Level Automatically
Adjusting the Audio Recording Level Manually
Useful Functions
Direct Menu Operation
Assignable Buttons
Slow & Quick Motion
Recording Video Intermittently (Interval Rec)
Recording Cached Pictures (Picture Cache Rec)
Recording to Memory Cards A and B Simultaneously (2-slot Simul Rec)
Video Signal Monitor
Clip Flags
Proxy Recording
Proxy Recording Overview
Recording a Proxy
Shooting with the Desired Look
Look Overview
Selecting a Look
Importing a Desired Base Look
Customizing a Look
Storing a Look as a Scene File
Deleting a Base Look
Renaming a Scene File
Sharing the Look with Another Camera
Saving a Scene File from Internal Memory to an External Device
Loading a Scene File Saved on an External Device into Internal Memory
Shooting with Look Adjustment in Post-Production
Shooting with Look Adjustment in Post-Production
Applying a LUT to SDI2 Output/HDMI Output and Streaming
Changing a LUT
Saving and Loading Configuration Data
Saving and Loading Configuration Data Overview
Saving an ALL File
Loading an ALL File
Network Functions
Transferring Files
About File Transfer
Registering a File Transfer Destination
Transferring Recorded Proxy Clips Sequentially
Selecting a File and Uploading
Uploading a Proxy Clip on a Memory Card from the Thumbnail Screen
Uploading an Original Clip on a Memory Card from the Thumbnail Screen
Checking the File Transfer Status
Uploading Using Secure FTP
Configuring Streaming
About Streaming
Setting the Streaming Format
Setting the Video Codec for Streaming
Setting the Audio Codec for Streaming
Starting/Stopping Streaming
Thumbnail Screen
Thumbnail Screen
Playing Clips and Other Clip Operations
Playing Recorded Clips
Operations on Recorded Clips
Camera Menu and Detailed Settings
Camera Menu Configuration
Operating the Camera Menu
Operating the Camera Menu
Entering a Character String
User Menu
[User]
Edit User Menu
[Edit User]
Shooting Menu
[ISO/Gain]
[ND Filter]
[Shutter]
[Auto Exposure]
[White]
[White Setting]
[Offset White]
[Focus]
[S&Q Motion]
[LUT On/Off]
[NIGHTSHOT]
[
Soft Skin Effect
]
[Noise Suppression]
[Flicker Reduce]
[Image Stabilization]
Project Menu
[Base Setting]
[Rec Format]
[Flexible ISO Setting]
[Simul Rec]
[Proxy Rec]
[
Interval Rec
]
[
Picture Cache Rec
]
[SDI/HDMI Rec Control]
[Assignable Button]
Paint/Look Menu
[Scene File]
[Base Look]
[Reset Paint Settings]
[Black]
[Knee]
[Detail]
[Matrix]
[Multi Matrix]
Pan-Tilt Menu
[P/T Acceleration]
TC/Media Menu
[Timecode]
[TC Display]
[Users Bit]
[HDMI TC Out]
[Clip Name Format]
[Update Media]
[Format Media]
[Media Life]
Monitoring Menu
[Output Format]
[Display On/Off]
[Video Signal Monitor]
[Marker]
Audio Menu
[Audio Input]
[Audio Output]
Thumbnail Menu
[Display Clip Properties]
[Set Clip Flag]
[Lock/Unlock Clip]
[Delete Clip]
[Copy Clip]
[Transfer Clip]
[Transfer Clip (Proxy)]
[Filter Clips]
[Customize View]
Technical Menu
[Color Bars]
[Genlock]
[Tally]
[Rec Review]
[Zoom]
[Lens]
[APR]
[Measurement]
Network Menu
[Wired LAN]
[File Transfer]
Maintenance Menu
[Language]
[Hours Meter]
Shooting Menu Settings and Default Values
[ISO/Gain] Settings and Default Values
[AGC Limit] Settings and Default Values
[Video Format] / [Quality] / [Bit Rate] Settings
Image Quality Settings Saved for Each Shooting Mode
Web Menu and Detailed Settings
Web Menu Configuration
Web Menu Operations
Shooting Menu
[Focus]
Project Menu
[Base Setting]
[Rec Format]
[Simul Rec]
[Proxy Rec]
[
Interval Rec
]
[
Picture Cache Rec
]
[All File]
Paint/Look Menu
[
Scene File
]
[Base Look]
Pan-Tilt Menu
[P/T Speed]
[P/T Acceleration]
[P/T Range Limit]
[P/T Direction]
[P/T Preset]
Monitoring Menu
[Output Format]
[Output Display]
Audio Menu
[Audio Input]
[Audio Output]
Technical Menu
[Tracking Data Output]
[Tracking Data]
[Tally]
[Tele Convert]
[IR Remote]
[RCP/MSU]
Network Menu
[Camera Name]
[User]
[Wired LAN]
[File Transfer]
[
FTP Server 1
], [
FTP Server 2
], [
FTP Server 3
]
[SSL]
[SSH]
[Referer Check]
[Brute Force Attack Protection]
Stream Menu
[Stream]
[Video Stream]
[Audio Stream]
Maintenance Menu
[Language]
[Clock Set]
[Reset]
[Information]
[System Log]
[HTTP Access Log]
[Service]
[Software]
External Device Connection
Connecting External Monitors and Recording Devices
Connecting an RCP/MSU (option)
Connecting with an RCP/MSU/CNA-2
One-to-One Connection Between the Unit and an RCP
Using the Unit in a Multi Camera Environment with an MSU/CNA-2/Camera Remote Control Software
List of Supported Functions
Operating Using an RM-IP500 Remote Controller (option)
About Operation Using an RM-IP500 Remote Controller (option)
Connecting an RM-IP500 Remote Controller via Wired LAN
Using the Camera Remote SDK
About the Camera Remote SDK
Synchronizing with an External Device
About Synchronizing with an External Device
Synchronizing the Phase of the Video Signal (Genlock)
Locking the Timecode to Other Devices
Connecting an External Microphone or External Audio Device
Managing/Editing Clips Using a Computer
Outputting an Optical Fiber Signal
Connecting a Tally Signal
Outputting Tracking Data
Appendix
Usage Precautions
Output Formats and Limitations
Troubleshooting
Error/Warning Messages
List of Menu Items
Preset Position Saved Items
Block Diagrams
Licenses
Specifications
Trademarks