Charging the batteries
Before using this product, charge the aircraft battery packs and built-in remote controller battery.
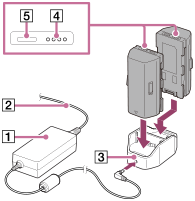
Charging the aircraft battery packs
The following is a procedure using the included LBP-HS1 battery packs. You can also use LBP-HM1 battery packs (sold separately) with this product.
-
Connect the power cord (
 ) to the AC adapter for battery charger (
 ).
). -
Connect the AC adapter to the power port (
 ) of the battery charger.
 -
Place the battery packs in the battery charger.
The battery charger can hold two battery packs and will charge the second one after the first one is charged. Both cannot be charged at the same time.
-
Firmly insert the plug of the power cord (
) into the wall outlet.The battery level LEDs of the battery pack (
 ) flash during charging and go off when the battery pack is fully charged.
To check the battery level
You can check the battery level by pressing the battery level button on each battery pack ( ).
).
Note
- It may take about 20 seconds before charging begins. Wait until the battery level LEDs start flashing.
- A safety mechanism prevents charging when battery packs are hot or cold. Charging begins automatically once battery packs can be charged at room temperature.
- If the difference between the remaining battery level in the two battery packs is 20% or more, the aircraft motor will not start.
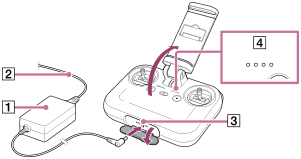
Charging the built-in remote controller battery
-
Connect the power cord (
) to the AC adapter for remote controller (). -
Open the power port cover of the remote controller and connect the AC adapter to the power port (
). -
Firmly insert the plug of the power cord (
) into the wall outlet.The battery level LEDs (
) flash during charging and go off when the battery is fully charged.
To check the battery level
You can check the battery level by pressing the  (Power) button on the remote controller once.