Parts for flight operations
The parts used for flight operations are described below.
Remote controller
The parts of the remote controller used for flight operations are described below.
-
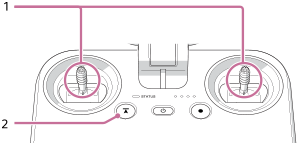
Control sticks
Control the orientation and movement of the aircraft.
There are two stick operating modes: [Mode 2] (default setting) and [Mode 1].
-
 (Automated flight pause) button
Press to pause the aircraft's movement during automated flight, if necessary to ensure safety.
-
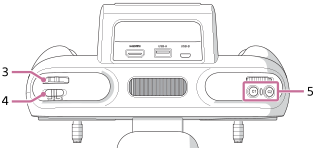
Control lever
Tilts the gimbal (up/down).
-
Flight mode switch
Selects the flight mode (1/2/3).
-
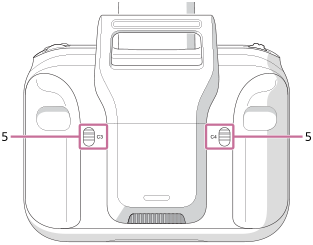
C1 (Custom 1)/C2 (Custom 2)/C3 (Custom 3)/C4 (Custom 4) buttons
Assign the functions for operating the aircraft, camera, and gimbal to these buttons in the setting menu of the “Airpeak Flight” App.
Flight screen (“Airpeak Flight” App)
The items on the flight screen used for flight operations are shown below.

-
 (Back)
Tap to go back to the App Home page.
-
Telemetry
-
 (Flight mode indication): Indicates the current position of the flight mode switch on the remote controller and the current flight mode.
 -
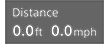 (Horizontal information indication): Indicates the horizontal speed of the aircraft and the distance from the take-off position.
 -
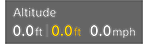 (Vertical information indication): Indicates the vertical speed of the aircraft and the altitude relative to the take-off position. The Vision Positioning altitude is also displayed when the Vision Positioning function is enabled.
-
-
Radio reception information
-
 (Indication of the number and signal strength of positioning satellites such as GNSS (Global Navigation Satellite System))
 -
 (Indication of the positioning information when using the RTK kit (sold separately)): You can check the status of RTK positioning.
The background turns yellow when the RTK positioning accuracy is low.
-
(RTK fixed state): RTK positioning is being performed with high accuracy.
-
 (RTK floating state): A certain period of time has elapsed since communication of correction information ceased, or the RTK positioning accuracy is low.
 -
 (RTK single point positioning state): Single point positioning is being performed by the aircraft’s GNSS because RTK positioning is not available.
-
-
 (Indication of the signal strength of the remote controller)
-
-
Remaining battery level
-
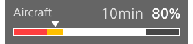 (Indication of the remaining flight time and remaining battery of the aircraft): Indicates the remaining flight time until forced landing due to insufficient battery power. The remaining battery level of the aircraft is indicated as a numerical value and a bar. The red area shows the remaining amount set for [Aircraft] - [Batteries] - [Start forced landing [%]] in the setting menu, and the yellow area shows the remaining amount set for [Battery-life alert [%]]. The triangle mark indicates the minimum battery level required to return to the Home Point. When the battery level drops to the level indicated by the triangle mark, the aircraft starts to perform RTH (Return to Home).
 -
 (Indication of the remaining battery of the camera)
 -
 (Indication of the remaining battery of the mobile device)
-
-
 (Settings)
Tap to display the setting menu. Tap
 (Close) to hide the menu.
 -
Side menu
Displays the current setting value for each button. By default, the following functions are assigned, but you can choose which functions to assign. To customize the items to display on the side menu, press and hold any one of the buttons on the side menu.
If your mobile device has a small screen, not all of the buttons are displayed. To display other buttons, swipe vertically on the side menu.-
[Display aircraft's battery details]
Displays the status of the aircraft battery packs.
-
[Tilt smoothness]
Adjusts the smoothness of the gimbal's tilting (up/down) movement.
-
[Pan smoothness]
Adjusts the smoothness of the gimbal's panning (left/right) movement.
-
[Gimbal control mode]
Selects the gimbal control mode.
-
[Maximum speed]
Sets the maximum value for the horizontal speed of the aircraft during manual flight.
-
[Auto control landing gear]
Toggles the automatic landing gear control function on and off with each tap.
-
[Vision Positioning]
Toggles the Vision Positioning function on and off with each tap.
-
-
 (FPV)
(FPV)Tap to display the FPV view in a sub screen.
-
 (RTH (Return to Home))
Tap to automatically return the aircraft to the Home Point.
-
 /
/ (Landing gear up/down)
Tap to raise or lower the landing gear.
-
 (Obstacle brake)
Tap to toggle the obstacle brake on and off for all directions except downward.
You can enable/disable the brake for each direction in the setting menu of the “Airpeak Flight” App (
(Settings) - [Aircraft] - [Sensors/Radio] - [Obstacle brake]). -
 (Automated flight menu)
Tap to display the [Flight functions] menu.
-
 (Auto take off)/
 (Auto landing)/
 (Automated flight start)/
 (Automated flight pause)
 Tap to perform takeoff and landing. The indication changes according to the flight status.
-
 (Informational content switching)
Tap to change the amount of information displayed on the flight screen.
-
 (Wind speed/direction)/
 (Tilt direction)
-
(Wind speed/direction): Displays the wind speed/direction around the aircraft.
-
(Tilt direction): Displays the tilt direction of the main gimbal.
-
-
 (Map)
(Map)Tap to display the map view in a sub screen.