Creating a Mapping Mission
By specifying the desired range (target mapping area) on a map in the “Airpeak Flight” App using a polygon, you can automatically generate a flight path for surveying.
-
Start the “Airpeak Flight” App.
Projects and missions created in the “Airpeak Base” App are automatically downloaded from the cloud to the “Airpeak Flight” App.
You can also download projects and missions manually by tapping the account icon and then [Sync with cloud] on the “Airpeak Flight” App Home page.
-
Tap
 (Project selection) on the “Airpeak Flight” App Home page.The project selection screen will be displayed.
 -
Tap the project in which you have previously set the desired flight area.
-
Tap [Start flight] on the “Airpeak Flight” App Home page.The flight screen will be displayed.
-
Tap
 (Automated flight menu).
 -
In the [Flight functions] menu, tap [Mapping Mission].
-
In the [Select mission] menu, tap
 (Menu) and tap [Create new mission].
Hint
- If you import geographic coordinate data (KML-format data specifying the target mapping area using coordinate information on the map) into the “Airpeak Base” App, the data will be synchronized with the “Airpeak Flight” App, and you will be able to create a Mapping Mission based on the geographic coordinate data. In this case, in the [Select mission] menu, tap (Menu) and tap [Create from geo coordinate data].
- If you import geographic coordinate data (KML-format data specifying the target mapping area using coordinate information on the map) into the “Airpeak Base” App, the data will be synchronized with the “Airpeak Flight” App, and you will be able to create a Mapping Mission based on the geographic coordinate data. In this case, in the [Select mission] menu, tap
-
Tap the desired point on the map.
A quadrangle (
 ) representing the target mapping area will be displayed at the point you tapped on the map.
The flight path is displayed as a line (
 ) starting from
  (start point) and ending at
  (end point).
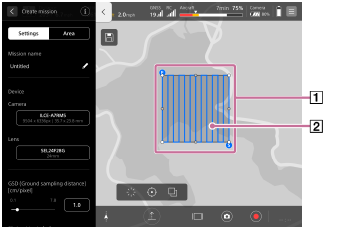
-
Edit the shape of the target mapping area to fit the desired range.
To transform or move the target mapping area
You can transform or move the area by dragging the vertices of the polygon on the map.
You can also specify a detailed location by following the steps below.
-
Tap the [Area] tab of the [Create mission] menu.
-
Tap a vertex of the polygon on the map to select it.
-
Enter values for [Latitude] and [Longitude].
To increase the number of vertices of the target mapping area
By dragging a point between the vertices of the polygon on the map, you can increase the number of vertices of the polygon, such as turning a quadrangle into a pentagon.
To decrease the number of vertices of the target mapping area
You can delete the selected vertex by following the steps below.
-
Tap the [Area] tab of the [Create mission] menu.
-
Tap a vertex of the polygon on the map to select it.
-
Tap [Delete].
To expand the target mapping area
By tapping the [Settings] tab of the [Create mission] menu and setting [Expand target mapping area], you can expand the area and shoot a wider area than the specified one.
-
-
In the [Settings] tab of the [Create mission] menu, enter a name for the mission and edit the setting items for the devices and flight path.
If you edit the parameters in the [Settings] tab, the flight path will change according to the settings.
-
After the settings are complete, tap
 (Save).
The Mapping Mission will be saved.