Flying the aircraft according to a Timeline Mission
You can automatically fly the aircraft according to a Timeline Mission (flight path) created using the “Airpeak Base” App.
-
Create projects and Timeline Missions based on your flight plan with the “Airpeak Base” App.The projects and Timeline Missions will be stored in the cloud.
-
Start the “Airpeak Flight” App.
Projects and Timeline Missions created in the “Airpeak Base” App are automatically downloaded from the cloud to the “Airpeak Flight” App.
You can also download projects and missions manually by tapping the account icon and then [Sync with cloud] on the “Airpeak Flight” App Home page.
-
Tap
 (Project selection) on the “Airpeak Flight” App Home page.The project selection screen will be displayed.
 -
Tap the project that contains the desired Timeline Mission.
-
Turn on the aircraft and place it on a flat surface.
-
Tap [Start flight] on the “Airpeak Flight” App Home page.The flight screen will be displayed.
-
Tap
 (Automated flight menu).
 -
In the [Flight functions] menu, tap [Timeline Mission].
-
In the mission list, tap the Timeline Mission according to which you want to fly the aircraft.A map that shows the flight path of the selected Timeline Mission will be displayed on the screen.
-
In the [Edit flight path] menu, check the flight path, edit it if necessary, and then tap [Next].
-
In the [Flight settings] menu, select the desired setting values, and then tap [Next].A preflight check will be performed. If errors are detected, fix them.
-
Tap [Start flight] and follow the on-screen instructions to operate the aircraft.
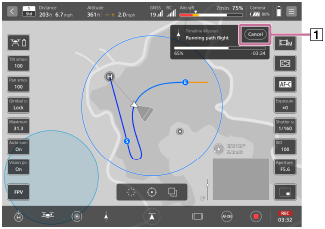
The aircraft will start the automated flight. If there is some distance to the starting point of the flight path, the aircraft will fly automatically to the starting point (preparation flight). Make fine adjustments to the flight path or pause/stop the flight if necessary.
When the aircraft reaches the end point, it will hover or perform RTH (Return to Home) depending on the settings.
Hint
- If an obstacle is detected during the preparation flight, the behavior set in
 (Settings) - [Aircraft] - [Behavior] - [Smart Obstacle Avoidance] will be applied.
- If an obstacle is detected during the preparation flight, the behavior set in
Pausing an automated flight
If you press the  (Automated flight pause) button on the remote controller during an automated flight, the automated flight will be paused and the aircraft will hover. Horizontal movement/turning/ascending/descending/stop operations can be performed while paused. To resume automated flight, tap
  (Automated flight start) on the flight screen of the “Airpeak Flight” App.
Switching to a manual flight
Tap [Cancel] ( ) on the flight screen of the “Airpeak Flight” App during the automated flight to stop the automated flight. The aircraft will hover.
Adjusting the flight path manually
You can make fine adjustments to the starting point of the automated flight and the flight path during an automated flight with the control sticks on the remote controller.
- Making fine adjustments to the starting point of the automated flight: The entire flight path including the starting point will move in parallel in the direction in which the control stick is operated.
- Making fine adjustments to the flight path during an automated flight: Select either of the following methods in the [Flight settings] menu of the “Airpeak Flight” App.
- Similar to making fine adjustments to the starting point of the automated flight, the flight path will move in parallel in the direction in which the control stick is operated.
- While operating the control stick, the aircraft flies in the direction in which the control stick is operated. When you stop operating the control stick, the aircraft will return to the original automated flight path.
Resuming automated flight
- Even if an automated flight is stopped by switching to a manual flight or performing RTH (Return to Home) due to low battery, the automated flight can be resumed from where it was stopped.
- Even after the aircraft is turned off and then back on, the immediate preceding automated flight can be resumed. You can also resume an automated flight during a manual flight.
- To resume an automated flight, tap (Automated flight menu) on the flight screen of the “Airpeak Flight” App, select [Suspended mission], and then follow the on-screen instructions to resume the flight.
Preventing the aircraft from approaching columnar structures
When shooting columnar structures such as radio towers, the following settings and flight paths are recommended. You can prevent the aircraft from getting too close to the shooting target, allowing it to keep at least a certain distance from objects during flight.
- Select the following setting values in order in the [Flight settings] menu in step 11.
- Set [Aircraft nose direction] to [Main camera direction].
The distance to the shooting target is recognized by the forward-facing stereo camera of the aircraft. Point the nose of the aircraft toward the shooting target when flying. It is recommended that you calibrate the forward-facing stereo camera in advance. - Set [Behavior when in manual control] to [Change entire flight path; continue changed path after quitting manual control].
- Set [Proximity prevention] to [On].
The aircraft will fly at least a certain distance from the shooting target.
- Set [Aircraft nose direction] to [Main camera direction].
-
Keep at least a certain distance between the aircraft and the structures when creating a flight path.
An automated flight may be unable to continue if the flight path is too close to structures. When creating a Timeline Mission, make sure the distance between the aircraft and structures is greater than the minimum distance (horizontal distance) from the shooting target. The distance is to the surface, not to the center of the structure.
- When the minimum distance from the shooting target is set to 10 m (32.8 feet): The distance between the aircraft and structures should be greater than 12 m (40 feet).
- When the minimum distance from the shooting target is set to 15 m (49.2 feet): The distance between the aircraft and structures should be greater than 18 m (60 feet).
Note
- The aircraft will terminate automatic flight if the following situations occur. Control the aircraft by manual operation.
- When the aircraft's landing gear lowers during a preparation flight or path flight (*1)
- When the obstacle brake function is activated continuously over a certain period of time during a path flight (*1)
*1 Refers to the flight from the starting point to the end point of the flight path.
Perform automated flight after correcting the path to a safe one. - On flights using the RTK kit (sold separately), the RTK positioning accuracy may decrease due to factors such as the environment. Fly the aircraft while checking the RTK positioning status on the flight screen in the “Airpeak Flight” App. Also, even if [Fixed] is displayed for [RTK] - [Systems] - [Positioning] - [Accuracy] in the setting menu of the “Airpeak Flight” App, the absolute accuracy of the aircraft position will depend on the correction data for the base station/network station set as the RTK reference station.
Hint
-
For detailed information on how to use the “Airpeak Base” App, refer to the “Airpeak Base User Guide.”
https://base.airpeak.sony.com/userguide/docs/introduction/airpeakbase