Parts and controls (Remote controller)
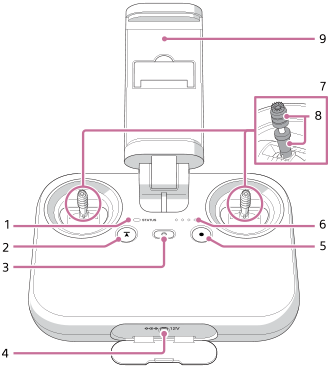
The locations of the parts and controls of the remote controller are shown below.

-
Status LED
Indicates the status of the remote controller.
LED color LED indication Status of the remote controller None Off Turned off Green Lit up Not connected to the aircraft Blue Lit up Connected to the aircraft as the main controller Purple Lit up Connected to the aircraft as the sub controller Green Blinking Starting up Green Blinking slowly at an interval of 6 seconds In a standby state Red Blinking An error has occurred in the remote controller. Yellow Blinking There has been no operation for more than 5 minutes. The remote controller will enter a standby state if you leave it without performing any operation. Cyan Lit up In the system software transfer mode Cyan Blinking twice repeatedly Waiting for the completion of linking with the aircraft. Green, red, and yellow Blinking alternately Updating system software -
 (Automated flight pause) button
Press to pause the aircraft's movement during automated flight.
-
 (Power) button
Operation Result Press The battery level LEDs light up or blink to show the remaining battery level. Press and hold for 2 seconds The remote controller turns on. Press and hold for 5 seconds The remote controller turns off. Press and hold for 2 seconds while the remote controller is turned on The remote controller enters a standby state. Press and hold for 2 seconds once again to wake it up from the standby state. Press and hold for 10 seconds The remote controller is forcibly turned off.
If the power is still on after you pressed and held the (Power) button for 10 seconds, simultaneously press and hold the C2 (Custom 2) button and the (Power) button for at least 10 seconds. -
Power port
-
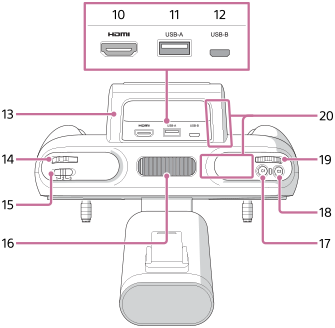
 (MOVIE) button
Press to start/stop video recording.
-
Battery level LEDs
Indicate the remaining battery level of the remote controller.
LED indication Remaining battery level All lit up Full Three lit up Approx. 75% Two lit up Approx. 50% One lit up Approx. 25% Blinking fast Low Off None -
Control sticks
Control the aircraft and gimbal (sold separately).
-
Lever heads
The lever heads of the remote controller are compatible with the following product.
- Manufacturer: Futaba Corporation
- Part Number: EBT2277
- Part Name: Gold Stick Ends
- URL: https://futabausa.com/product/ebt2277/
-
Mobile device holder
Mount the mobile device on which you have installed the “Airpeak Flight” App.
-
HDMI port
-
USB port (USB-A)
Connect a USB cable to this port and to the mobile device attached to the mobile device holder.
-
Micro USB port (USB-B)
-
Handle bar
An antenna for wireless transmission is built in. Be careful not to cover the antenna part with your hand or cables.
-
Control lever
Tilts the gimbal (up/down).
-
Flight mode switch
Selects the flight mode.
-
Air vent
Do not block the air vent with your hand or other objects while using the remote controller.
-
C1 (Custom 1) button
Assign the desired function to this button in the setting menu of the “Airpeak Flight” App. By default, you can take a photo by pressing this button.
-
C2 (Custom 2) button
Assign the desired function to this button in the setting menu of the “Airpeak Flight” App. By default, you can adjust the ISO sensitivity (recommended exposure index) of the camera (sold separately) by turning the control dial after pressing this button.
-
Control dial
Adjusts the aperture value (F-value) of the camera.
-
Antenna (built-in)
-
C3 (Custom 3) button
Assign the desired function to this button in the setting menu of the “Airpeak Flight” App. The following functions are assigned by default:
- Adjust the shutter speed of the camera by turning the control dial after pressing this button.
- Tilt the FPV gimbal (up/down) by moving the control lever while pressing this button.
- Reset the FPV gimbal position by pressing this button twice.
-
Air inlet
Do not block the air inlet with your hand or other objects while using the remote controller.
-
C4 (Custom 4) button
Assign the desired function to this button in the setting menu of the “Airpeak Flight” App. The following functions are assigned by default:
- Change the focus mode setting of the camera by turning the control dial after pressing this button.
- Pan the main gimbal (left/right) by moving the control lever while pressing this button.
- Reset the main gimbal position by pressing this button twice.