Mounting a camera on the gimbal GBL-PX1
- Remove the shoulder strap attachment (
 ) from the camera.
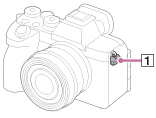
- Remove the L-Bracket (
 ) from the gimbal.
Loosen the lever (
 ), and move the L-Bracket forward to remove it while pressing the release button (
 ) at the bottom.
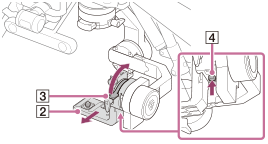
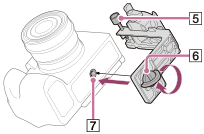
- Loosen the camera fixing screw (
 ), and temporarily attach the tripod screw (
 ) on the L-Bracket to the tripod socket (
 ) on the bottom of the camera.
Make sure there is a gap of about 1 mm between the L-Bracket and the bottom of the camera.
- Pass the camera fixing screw () through the hook for the shoulder strap (
 ) on the camera and secure it.
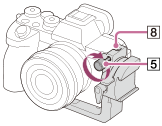
- Adjust the mounting angle so that the L-Bracket () and the camera are oriented parallel.
Proper mounting angle (left: view from bottom of camera/right: view from left side of camera)
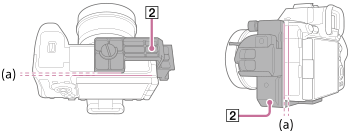
(a) Parallel
Improper mounting angle (left: view from bottom of camera/right: view from left side of camera)
(b) Not parallel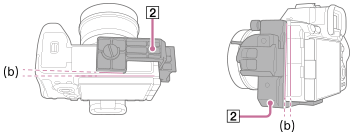
- Fix the camera and L-Bracket so that they are at the mounting angle shown in step 5, and then fully tighten the tripod screw using a coin, etc.
- Place the camera in the gimbal.
Unlock the lever (
) and place the camera in the gimbal from the front.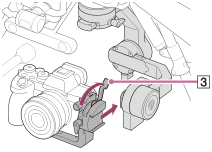
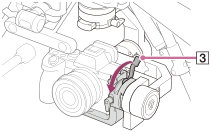
- Secure the camera in the gimbal.
Lock the lever (
).
Note
- Be careful not to get your fingers caught when operating the lever.
- Store the shoulder strap attachment securely so as not to lose it.
- Before flights, make sure the camera is firmly secured to the L-Bracket with the tripod screw and camera fixing screw.
- When removing the camera from the L-Bracket, perform the reverse procedure.