Creating a Timeline Mission
Create a Timeline Mission with the “Airpeak Base” App, and then set a flight path.
-
Click on [Projects] on the “Airpeak Base” App Home page.
-
Click on the project for which you want to set a flight path.
- Click on [Add mission] in the [Flight plans] tab, and then select [Create new Timeline Mission] from the menu.The [Create Timeline Mission] dialog will be displayed.
- Fill in the dialog, and then click on [Set].
- [Flight duration (30 fps)]: Set the flight duration.
- [Finish action]: Set a finish action for the aircraft.
The Timeline Mission screen will be displayed.
-
Set a keyframe to the flight start position.
-
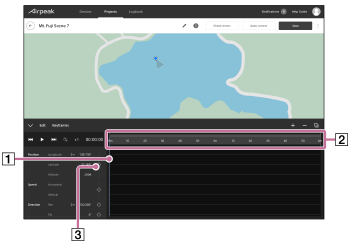
Make sure that the indicator (
 ) is at the “0” position of the elapsed time scale (
 ).
).Drag the gray bar in the elapsed time scale (
) to zoom in or out on the elapsed time scale. -
Drag
 (Aircraft) to the desired position on the map.
 -
Click on
 (Set) (
 ).
).
The keyframe will be set to the flight start position.
-
-
Drag the indicator over the elapsed time scale to move to the next keyframe position.
-
Repeat procedures 2 and 3 of step 5 to set another keyframe.The keyframes will automatically be connected by a natural curve to form a flight path. You can adjust the flight path later.
-
Repeat steps 6 and 7 to set more keyframes.
-
Click on [Check errors] when you have finished creating the flight path.
If errors are displayed, click on [Auto correct] to correct the errors that can be corrected automatically. If there are errors that cannot be corrected automatically, correct them manually.
-
Click on [Save].
-
Enter the mission name in the dialog, and then click on [Save].
Adjusting the flight path
-
Select a keyframe by clicking on it on the map.
-
Drag the keyframe or the handle to adjust the flight path.
-
Click on [Save] when you have completed the adjustment.
Adjusting the altitude of the flight path
-
Click on [Altitude].
Changes in altitude are shown by a line on the graph.
-
Select a keyframe on the line by clicking on it, and then drag the keyframe or the handle to adjust the altitude.
-
Click on [Save] when you have completed the adjustment.
Hint
-
If you sign up for “Airpeak Plus,” you can import or export a Timeline Mission from
 (Menu) on the Timeline Mission screen. The following formats can be selected.
- ESP or KML: Select when using a mission with services from other companies
-
When using Timeline Missions with the “Airpeak Base” App, the camera orientation is displayed relative to space. The pan axis displays the north orientation as 0°, the tilt axis displays the ground orientation as 0°, and the roll axis displays the horizontal orientation as 0°. If you prefer the tilt axis to display the horizontal orientation as 0° on the Timeline Mission screen, change the setting on the account setting screen of the “Airpeak Base” App.
-
For detailed information on how to use the “Airpeak Base” App, refer to the “Airpeak Base User Guide.”
https://base.airpeak.sony.com/userguide/docs/introduction/airpeakbase