Attaching the propellers
The aircraft uses two types of propellers: clockwise (CW) and counterclockwise (CCW) propellers, which rotate in different directions. Using the hub color as a guide, attach propellers with hubs of the same color. When attaching/removing the propellers, make sure that the aircraft is turned off and be careful not to get injured by the edges.
-
Make sure the aircraft is off.Confirm that the power status LED on the aircraft is off.
-
Check the propeller hub.
Propeller (CW)
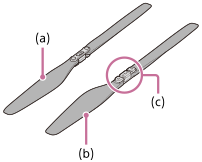
(a) Top side of the propeller
(b) Underside of the propeller
(c) Hub (silver)
Propeller (CCW)
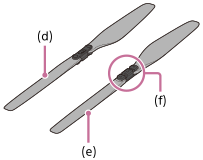
(d) Top side of the propeller
(e) Underside of the propeller
(f) Hub (black)
- Attach the propellers (CW) (
 ) to the motors with silver hubs (
 ).
).Place the propeller on the propeller attachment point and turn the propeller counterclockwise until it clicks into place. Hold the motor (
) firmly in place with your other hand to prevent it from turning.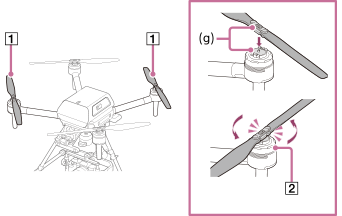
(g) Silver
- Attach the propellers (CCW) (
 ) to the motors with black hubs (
 ).
).Place the propeller on the propeller attachment point and turn the propeller clockwise until it clicks into place. Hold the motor (
) firmly in place with your other hand to prevent it from turning.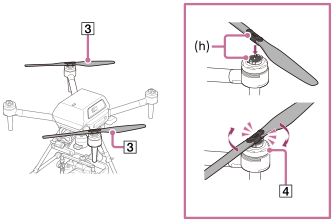
(h) Black
Note
- Before each flight, confirm that the propellers are securely attached.
- If you do not hear a clicking sound when attaching the propellers, the propellers may not have been attached properly and pose a risk of crash. Refrain from using the aircraft and contact Sony Customer Support.
- If the sliding part of the propeller attachment point does not move smoothly, the propeller may fall off during flight and pose a risk of crash. Refrain from using the aircraft and contact Sony Customer Support.
- Before attaching the propellers, make sure that the stickers on the motors are not damaged. If the stickers on the motors are peeled off or the adhesive layers of the stickers are exposed, the propellers may not have been attached properly and pose a risk of crash. Refrain from using the aircraft and contact Sony Customer Support.
To remove the propellers
-
Make sure the aircraft is off.
Confirm that the power status LED (
 ) on the aircraft is off.
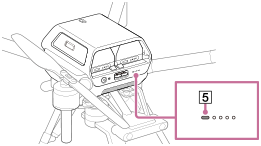
-
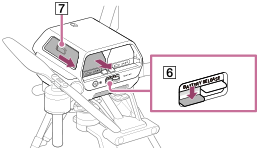
While pressing the BATTERY RELEASE levers (
 ), push out the projecting parts on the sides of the battery packs (
 ) in the directions of the arrows to remove both battery packs.
Press the BATTERY RELEASE levers carefully so that the battery packs do not hit your fingers. Battery packs are still hot immediately after use. Handle with care. Also, be careful not to drop the battery packs.
-
Remove the propellers (CW) (
).Press the propeller hub against the sliding part of the motor and turn the propeller clockwise to remove it. Hold the motor (
) firmly in place with your other hand to prevent it from turning.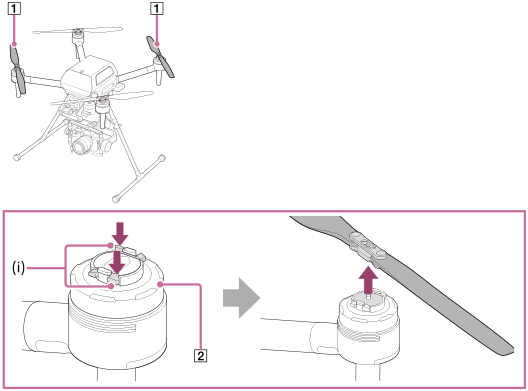
(i) Sliding part of the motor
-
Remove the propellers (CCW) (
).Press the propeller hub against the sliding part of the motor and turn the propeller counterclockwise to remove it. Hold the motor (
) firmly in place with your other hand to prevent it from turning.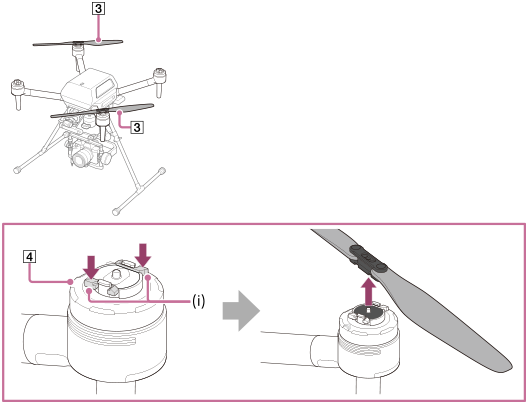
(i) Sliding part of the motor
Note
- Be careful not to touch the motor and its surrounding parts as they become hot after use. There is a risk of burns.