Configuring settings on the camera
Prepare the camera before mounting it on the gimbal. (Both the camera and gimbal are sold separately.)
The following is a sample procedure using an ILCE-7RM5 camera.
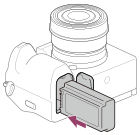
- Open the battery cover and insert a battery pack.

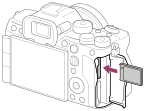
- Open the memory card cover and insert a memory card.

- Configure the following setting items on the camera.
For setting instructions, refer to the camera operating instructions or online Help Guide (Web manual).
- [PC Remote Function] - [PC Remote]: [On]
- [PC Remote Function] - [Still Img. Save Dest.]: [PC+Camera]
Captured still images are saved to the camera. The thumbnail functions for captured still images are available in the “Airpeak Flight” App. - [Ctrl w/ Smartphone] - [Ctrl w/ Smartphone]: [Off]
- [USB Power Supply]: [Off]
- [File Format]: [RAW+JPEG] or [JPEG]
Note
- During flights, cameras consume battery power as you shoot. Always charge the camera battery sufficiently before mounting on the gimbal.
- Use memory cards with sufficient free space for recording images.
- Make sure that the camera's battery cover is securely closed and locked.
- Be sure to set the Bluetooth function of the camera to [Off]. If it is set to [On], it may affect the wireless transmission function.
- To display thumbnails of the captured still images in the “Airpeak Flight” App, set [General] - [Display/Voice] - [Image thumbnail] - [Show thumbnail] to [On] in the setting menu of the “Airpeak Flight” App.
Hint
- When the camera is attached to the gimbal and operated, the eye sensor of the camera may react, and the monitor may turn off/on. You can keep the monitor off or on at all times by selecting a setting other than [Auto] for [Select Finder/Monitor] on the camera.
- If you are using the RTK kit (sold separately), you can assign position information to captured still images. For details, refer to “Making use of flight logs and RTK positioning data.”

