


Attaching/Removing a Lens
Turn off the camera before attaching or removing the lens.
-
Remove the body cap (A) from the camera and the rear lens cap (B) from the rear of the lens.
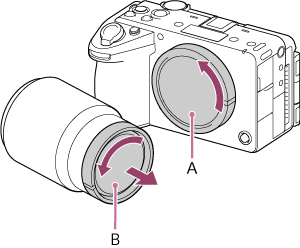
- It is recommended that you attach the front lens cap after you finish shooting.
-
Mount the lens by aligning the two white marks (mounting indexes) on the lens and camera.
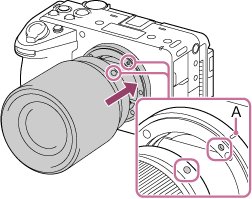
- Hold the camera with the lens mount facing down to prevent dust and debris from entering the camera.
- The lens mount has a bar-shaped protrusion (A) on its side. Use this as a guide when attaching a lens.
-
While pushing the lens gently against the camera, turn the lens slowly in the direction of the arrow until it clicks into the locked position.
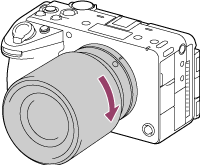
- Be sure to hold the lens straight when attaching it.
To remove the lens
While pressing the lens release button (A), turn the lens in the direction of the arrow until it stops.
After removing the lens, attach the body cap to the camera and the lens caps to the front and rear of the lens to prevent dust and debris from entering the camera and lens.
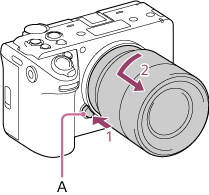
Note
- When attaching/removing the lens, work quickly in a dust-free location.
- Do not press the lens release button when attaching a lens.
- Do not apply excessive force to the lens.
- A mount adaptor (sold separately) is required to use an A-mount lens (sold separately). When using the mount adaptor, refer to the operating manual supplied with the mount adaptor. The unit supports the LA-EA3/LA-EA4/LA-EA5 mount adaptor (sold separately).
- To shoot full-frame images, use a full-frame size compatible lens.
- When using a lens with a tripod socket, attach a tripod to the tripod socket of the lens to help balance the weight of the lens.
- When carrying the camera with a lens attached, hold both the camera and the lens firmly.
- Do not hold the part of the lens that is extended for zoom or focus adjustment.
About iris adjustment if the lens has an Auto Iris switch
- Setting the Auto Iris switch of the lens to AUTO enables automatic iris adjustment, or manual adjustment from the unit.
- Setting the Auto Iris switch of the lens to MANUAL enables adjustment using the lens ring only. Iris operations from the unit are no longer accepted.
About focus adjustment if the lens has a focus switch
- Setting the focus switch of the lens to “AF/MF” or “AF” enables automatic focus adjustment, or manual adjustment from the Bluetooth remote control.
-
Setting the focus switch of the lens to “MF” enables lens ring adjustment, or manual adjustment from the Bluetooth remote control.
Note
- When using an A-mount lens, manual adjustment from the Bluetooth remote control may not be supported.
- Setting the focus switch of the lens to “Full MF” enables adjustment using the lens ring only. Focus operations from the unit are no longer accepted.
About anamorphic lenses
For details about how to display de-squeezed HDMI output video and how to display de-squeezed video in the viewfinder of the unit when shooting with an anamorphic lens, see “Configuring De-Squeeze Display.”
TP1002274777