


Connecting to the Internet via Wired LAN
You can connect to the Internet by connecting the unit and a wireless LAN router by wired LAN connection.
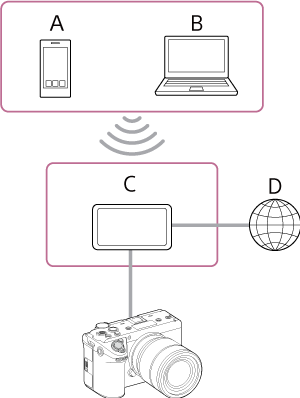
A: Smartphone/tablet
B: Computer
C: Wireless LAN router
D: Internet
- Connect the LAN connector of the unit to a wireless LAN router using a LAN cable.
- Turn the unit on.
-
Set [Network] – [Wired LAN] – [Setting] to [On] in the full menu.
Note
- The unit does not support simultaneous use of wireless LAN and wired LAN.
- The unit is not a network device (for example, a router or switching hub). It is strongly recommended that you connect the unit to a network where you can configure and manage the network settings appropriately to protect against network-based attacks, such as DoS attacks (Denial of Service attacks).
- When connecting the unit to a network, connect it via a router that is configured and managed appropriately, or connect it to a LAN port that has the same functionality. If connected without such protection, problems may occur. When properly configured, routers provide sufficient protection against DoS attacks or loss of functionality of devices in the network. If you notice anything unusual, immediately disconnect the camera from the network.
-
Configure the following settings using [Network] – [Wired LAN] – [Detail Settings] in the full menu, as required, and select [Set].
Configuration item Description [DHCP] Set the DHCP setting. When set to [On], the IP address is assigned to the unit automatically.
To assign an IP address to the unit manually, set to [Off].[IP Address] Enter the IP address of the unit.
This setting is available only when [DHCP] is set to [Off].Note
- Use the ▲/▼ buttons to enter an address in the range 0.0.0.0 to 255.255.255.255 for each segment.
[Subnet Mask] Enter the subnet mask of the unit.
This setting is available only when [DHCP] is set to [Off].Note
- Use the ▲/▼ buttons to enter an address in the range 0.0.0.0 to 255.255.255.255 for each segment.
[Gateway] Enter the address of the gateway.
This setting is available only when [DHCP] is set to [Off].Note
- Use the ▲/▼ buttons to enter an address in the range 0.0.0.0 to 255.255.255.255 for each segment.
[DNS Auto] Set whether to acquire DNS automatically. When set to [On], the DNS server address is automatically acquired.
This setting is available only when [DHCP] is set to [On].[Primary DNS Server] Enter the address of the primary DNS server.
This setting is available only when [DNS Auto] is set to [Off].Note
- Use the ▲/▼ buttons to enter an address in the range 0.0.0.0 to 255.255.255.255 for each segment.
[Secondary DNS Server] Enter the address of the secondary DNS server.
This setting is available only when [DNS Auto] is set to [Off].Note
- Use the ▲/▼ buttons to enter an address in the range 0.0.0.0 to 255.255.255.255 for each segment.
Hint
- To use “Monitor & Control” or the “Camera Remote SDK” to control the unit from an external device, set [Network] – [Wired LAN] – [Camera Remote Control] to [Enable] in the full menu.
- You can check the authentication information for connecting to the unit using [Network] – [Network Setup] – [Show Authentication] in the full menu. Take care that the screen cannot be viewed and the QR code image cannot be copied by others.
Note
- Always select [Set] after changing the connection settings. The settings are not applied if [Set] is not selected.