


XLR Handle Unit (ILME-FX5 only) Inputs and Multi Interface Shoe Output Channels
This topic describes the connectors and output channel settings according to the type and number of microphones (sold separately) you used.
Using a single microphone
-
When using an XLR monaural microphone
Connect to the INPUT1 connector and set the INPUT SELECT (CH1/CH2) switch to the “1/1” position.
This enables dual-mono recording to CH1 and CH2, making it suitable for audio recording for a documentary.

You can also set the INPUT SELECT (CH3/CH4) switch to the “1/1” position to record audio with a different audio recording level than CH1 and CH2 to CH3 and CH4 as a backup.
Set the AUTO/MAN (CH3/4) switch to the “MAN” position and adjust the audio recording level using the AUDIO LEVEL (CH3/4) dial.

-
When using an XLR (L/R) stereo microphone
Connect the Lch plug to the INPUT1 connector and the Rch plug to the INPUT2 connector, and set the INPUT SELECT (CH1/CH2) switch to the “1/2” position.
This enables stereo recording to CH1 and CH2, making it suitable for audio recording of live performances and outdoor locations.

You can also set the INPUT SELECT (CH3/CH4) switch to the “1/2” position to record audio with a different audio recording level than CH1 and CH2 to CH3 and CH4 as a backup.
Set the AUTO/MAN (CH3/4) switch to the “MAN” position and adjust the audio recording level using the AUDIO LEVEL (CH3/4) dial.

-
When using a stereo mini plug, stereo microphone
Connect to the INPUT3 connector and set the INPUT SELECT (CH1/CH2) switch to the “3L/3R” position.
This enables stereo recording to CH1 and CH2, making it suitable for audio recording of live performances and outdoor locations.

You can also set the INPUT SELECT (CH3/CH4) switch to the “3L/3R” position to record audio with a different audio recording level than CH1 and CH2 to CH3 and CH4 as a backup.
Set the AUTO/MAN (CH3/4) switch to the “MAN” position and adjust the audio recording level using the AUDIO LEVEL (CH3/4) dial.

Hint
- When using a single microphone, it is not necessary to always output audio to all four channels (CH1 to CH4). Set the number of channels to use and the INPUT SELECT switches as required.
Using multiple microphones
-
When using an XLR monaural microphone and a stereo mini plug, stereo microphone
Connect the monaural microphone to the INPUT1 connector and the stereo microphone to the INPUT3 connector.
This enables recording audio of multiple microphones separately in situations, such as an interview.
To output the monaural microphone audio to CH1 and CH2 and the stereo microphone audio to CH3 and CH4, set the INPUT SELECT (CH1/CH2) switch to the “1/1” position and the INPUT SELECT (CH3/CH4) switch to the “3L/3R” position.
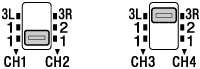
To output the monaural microphone audio to CH3 and CH4 and the stereo microphone audio to CH1 and CH2, set the INPUT SELECT (CH1/CH2) switch to the “3L/3R” position and the INPUT SELECT (CH3/CH4) switch to the “1/1” position.
-
When using an XLR (L/R) stereo microphone and a stereo mini plug, stereo microphone
Connect the Lch plug of the stereo microphone to the INPUT1 connector, the Rch plug to the INPUT2 connector, and the other stereo microphone to the INPUT3 connector.
This enables recording audio of background sound and speaker’s voices separately in situations, such as an outdoor interview.
To output the XLR stereo microphone audio to CH1 and CH2 and the stereo mini plug, stereo microphone audio to CH3 and CH4, set the INPUT SELECT (CH1/CH2) switch to the “1/2” position and the INPUT SELECT (CH3/CH4) switch to the “3L/3R” position.
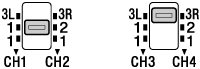
To output the XLR stereo microphone audio to CH3 and CH4 and the stereo mini plug, stereo microphone audio to CH1 and CH2, set the INPUT SELECT (CH1/CH2) switch to the “3L/3R” position and the INPUT SELECT (CH3/CH4) switch to the “1/2” position.