


Selecting Audio Input Devices on the XLR Handle Unit (ILME-FX5 only)
-
Connect the devices that you want to connect to the INPUT1 connector/INPUT2 connector/INPUT3 connector of the XLR handle unit.
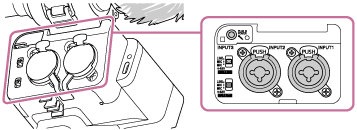
If using only one of the INPUT1 connector and INPUT2 connector, connect the device to the INPUT1 connector.
If connecting a device to the INPUT3 connector, skip to step 3.
-
Select the input audio source.
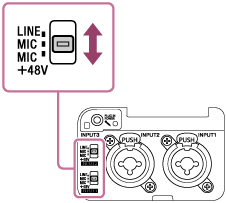
If connecting devices to the INPUT1 connector/INPUT2 connector, set the INPUT1 (LINE/MIC/MIC+48V)/INPUT2 (LINE/MIC/MIC+48V) switches to match the connected devices.
- LINE (reference input level: +4 dBu (0 dBu = 0.775 Vrms)): External audio device (e.g. mixer)
- MIC: Dynamic microphone, battery-operated microphone
- MIC+48V: +48 V phantom power microphone
- Before connecting/disconnecting a microphone, be sure to set the INPUT1 (LINE/MIC/MIC+48V) switch to a position other than MIC+48V. Plugging/unplugging a cable while the switch is set to MIC+48V may cause a loud noise or a malfunction of the microphone.
- Selecting MIC+48V and connecting a microphone that is not compatible with a +48 V source may damage the connected device. Check the setting before connecting the device.
- If noise is a concern on connectors with no device connected, set the corresponding INPUT1/INPUT2 (LINE/MIC/MIC+48V) switches to LINE.
-
Select the channel to output from the XLR handle unit using the INPUT SELECT (CH1/CH2) / INPUT SELECT (CH3/CH4) switch.
Select the input audio to assign to each channel that is output from the XLR handle unit using INPUT1, INPUT2, or INPUT3.
-
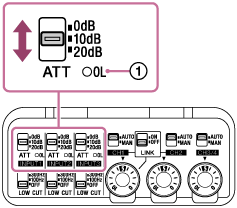
Set the reference input level of microphones using the ATT (INPUT1 / INPUT2 / INPUT3) switch for the inputs to which the devices are connected.
-
0dB: When you want to amplify the sound when recording, such as when using a microphone with low sensitivity.
- INPUT1/INPUT2: Reference input level −60 dBu
- INPUT3: Reference input level −76 dBu
-
10dB: Recommended audio recording level for a human voice.
- INPUT1/INPUT2: Reference input level −50 dBu
- INPUT3: Reference input level −66 dBu
-
20dB: When you want to suppress the sound when recording, such as when using a microphone with high sensitivity.
- INPUT1/INPUT2: Reference input level −40 dBu
- INPUT3: Reference input level −56 dBu
Note
- The ATT (INPUT1 and INPUT2) switches are enabled only when the corresponding INPUT1 (LINE/MIC/MIC+48V) switch or INPUT2 (LINE/MIC/MIC+48V) switch is set to the “MIC” position or “MIC+48V” position.
When set to the “LINE” position, the reference input level is +4 dBu (fixed), and the reference input level does not change even if the ATT switch position is changed.
Hint
- If there is loud input audio that would cause analog clipping, the OL (overload) lamp (
 ) of the XLR handle unit lights up. If this occurs, adjust the input level using the ATT switch on the connected device or the XLR handle unit, so that the audio level is within the range where the lamp does not turn on.
-
-
Adjust the audio recording level.
For details about adjusting, see “Adjusting the Audio Recording Level using the XLR Handle Unit (ILME-FX5 only).”