


Home Screen
Press the HOME button to display the Home screen on the LCD monitor. You can check the status of the unit and set basic items on the Home screen.
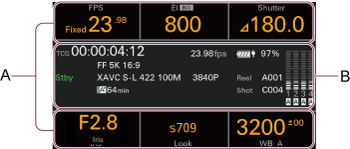
A: Item name / Setting value / Function display area
B: Status display area
Hint
- In the factory default setting, pressing the multi-function dial or an assignable button assigned with [Direct Menu] in information display mode displays a cursor on the Home screen, allowing you to change the settings of each item. To perform direct menu operations using an external monitor, set [Technical] – [Menu Settings] – [Info. Disp. Mode Operation] to [Direct Menu Priority] in the full menu.
Item name / Setting value / Function display area
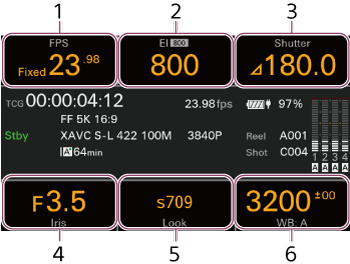
Select items displayed in 1 to 6 to set the corresponding item.
-
[FPS]
Displays and sets the shooting frame rate.
-
[Exposure Index] / [Base ISO]
Displays and sets [Exposure Index] and [Base ISO].
Hint
- In [Flexible ISO] mode, displays/sets [ISO] / [Base ISO]. In [Custom] mode, displays/sets [ISO] / [Base Sensitivity] or [Gain] / [Base Sensitivity].
-
[Shutter]
Displays and sets the electronic shutter.
-
[Iris]
Displays and sets the iris.
-
[Look]
Displays and sets the look.
Hint
- In [Custom] mode, this displays and sets scene files.
-
[WB] ([White Balance])
Displays and sets the white balance.
Status display area
-
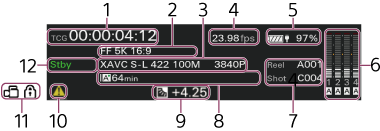
Time data display
Displays the duration, user bits, or timecode, depending on the [TC/Media] – [TC Display] setting in the full menu.
Displays the type of data currently shown in the time data display, as follows.
TCG: Recorded timecode
EXT-LK: External sync lock
UBG: Recorded user bits
TCR: Playback timecode
UBR: Playback user bits
Clk: Clock
Dur: Duration
-
Imager mode / Anamorphic lens ratio indicator
Displays the [Project] – [Imager Mode] / [Anamo. De-Squeeze] setting in the menu.
-
Recording format (codec) / Image resolution indicator
Displays the name of the format used for recording on a memory card and the image resolution.
-
Project frame rate indicator
Displays the [Project] – [Project Frame Rate] setting in the menu.
-
Power status indicator
Displays the remaining battery charge.
-
Audio level meter
Displays the audio level of CH1 to CH4.
-
Clip name display
When [Auto Naming] is set to [Cam ID + Reel#]:
Displays “Reel: camera ID + reel number” and “Shot: camera position + shot number.”When [Auto Naming] is set to [Title]:
Displays “Title: character string set using [Title Prefix]” and “No.: clip number.” -
Remaining media capacity indicator
Displays the status and remaining recording time (when recording in the current recording format) of each recording media.
-
Auto exposure adjustment operating mode and level indicator
Display Meaning 
Backlight mode 
Standard mode 
Spotlight mode -
Warning/error icon
Displayed when a warning or error occurs.
You can check the content of warnings and errors by displaying the menu. If the screen display is superimposed on an external monitor, you can also check on the external monitor.
-
Key lock status indicator
-
Recording status indicator
Displays the following recording operation states of the unit.
Display Meaning Stby Recording standby  Rec
RecRecording Int Stby Interval standby in Interval Rec mode Int RecRecording in Interval Rec mode (image capture interval) Int StbyRecording in Interval Rec mode (image not being captured)
Basic operations on the Home screen
-
Press the HOME button.
The Home screen appears on the LCD monitor.
-
Select the item to set from items 1 to 6.
In addition to selecting items using touch operation, you can also use the multi-function dial and multi selector when [Technical] – [Menu Settings] – [Info. Disp. Mode Operation] is set to [Home Screen Priority] in the full menu.
First, press the multi-function dial or an assignable button assigned with [Direct Menu] to display the cursor, then use the multi-function dial or multi selector to move the cursor. The cursor will disappear if 3 seconds have elapsed without any operation.
Note
-
When [Technical] – [Menu Settings] – [Info. Disp. Mode Operation] is set to [Direct Menu Priority] in the full menu, no operation can be performed by pressing the multi-function dial. Touch one of the items.
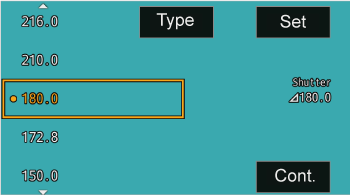
The setting selection screen appears. The diagram above shows an example when item 3 is selected.
-
-
Move the cursor to the selection item or setting.
-
Select the [Set] button to apply the value.
Hint
- On the setting selection screen, you can also use the multi-function dial or multi selector to move the cursor. After positioning the cursor and pressing the multi-function dial or multi selector, select the [Set] button to apply the value.
Home screen items
The settings that can be configured for each item are given below. For details about items with the same settings as in the full menu, refer to the full menu description.
| Item | Description |
|---|---|
| [FPS] |
Sets whether the shooting frame rate is set to the project frame rate or is different from the project frame rate.
Note
Hint
|
| [ISO/Gain] / [Base Sensitivity] ([Custom] mode) |
Sets ISO/Gain. You can press [Base Sensitivity] to set the base sensitivity . You can press [AGC] to set the auto gain control function. Hint
|
| [ISO] / [Base ISO] ([Flexible ISO] mode) |
Sets ISO. You can press [Base ISO] to set the base ISO sensitivity. You can press [AGC] to set the auto gain control function. Hint
|
| [Exposure Index] / [Base ISO] ([Cine EI] / [Cine EI Quick] mode) |
Sets Exposure Index. You can press [Base ISO] to set the base ISO sensitivity. Hint
|
| [Shutter] |
Sets the electronic shutter.
Hint
|
| [Iris] |
Sets the iris. You can press [Auto] to set the auto iris function. |
| [Scene File] ([Custom] mode) |
Switches to preconfigured image quality settings. In addition to the pre-installed image quality settings, you can save and switch to your preferred image quality settings . Hint
|
| [Look] (Log shooting mode) |
Sets the look. Press the [Edit Look] button (item 4) and select a look. You can set the output systems to which to apply a look using items 1 and 6. Depending on the status, there are combinations that cannot be set or settings that are interdependent. Hint
|
| [WB] ([White Balance]) |
Sets the white balance. Eight white memory positions (A/B/C/D/E/F/G/H) are provided. You can set values using the following methods.
Hint
|