


Rear Side
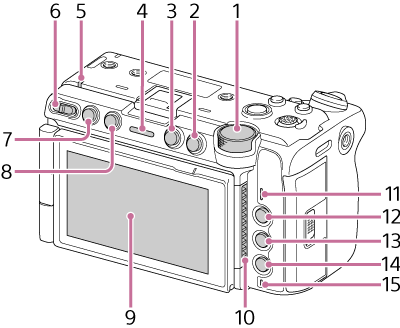
-
Multi-function dial
Press when viewing the image on the LCD monitor to display the direct menu.
Turn the dial when a menu is displayed on the LCD monitor to move the cursor up/down to select menu items or settings. Press to apply the selected item.
When the menu is not being displayed, the dial functions as an assignable dial.
-
BACK button
Press to return to the previous menu. Any unconfirmed changes are canceled.
-
MENU button
Press and release to display the menu screen. Press and hold to display the full menu screen.
-
Recording/tally lamp (rear)
Lights up when recording starts.
- Power lamp
- Power switch
-
CLIPS button
Press to display the clip list screen showing the clips on the active playback media and enable playback operations. Press this button while the clip list screen is displayed to return to the shooting screen.
- Assignable button 4
- LCD monitor/Touch panel
-
Air inlet
Note
- Do not cover the air inlet.
- Speaker
- Assignable button 5
-
HOME button
Press to display the Home screen on the LCD monitor. It is not displayed in the HDMI output video.
-
USER button
Press to show/hide the user functions screen.
- Access lamp