


Right Side
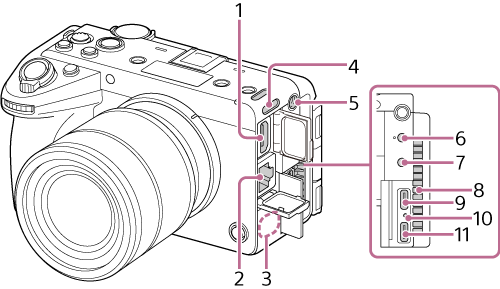
-
HDMI connector
Outputs an HDMI signal.
-
LAN connector
Wired LAN connector.
-
Wireless LAN antenna (built-in)
Covering this area with your hand or other objects may interrupt the Wi-Fi communication.
-
Shoulder strap (sold separately) attachment
-
Accessory screw hole
Compatible with 1/4-20 UNC screws
When attaching an accessory, use a screw of length 5.5 mm or shorter. If you use a screw that is longer than 5.5 mm, you will not be able to firmly secure the accessory to the unit, and the unit may be damaged.
-
Microphone connector
Connect to a Ø3.5 mm stereo mini jack (3-pole) microphone.
There is a small protrusion next to the microphone connector. Use the protrusion to distinguish the connector from the headphone connector.
- Headphone connector
-
Air outlet
Note
- Do not cover the air outlet.
- Exercise caution as the area near the air outlet will be hot.
-
USB Type-C® connector (USB PORT 1)
Use for mass storage, USB tethering, remote control operation.
- Charging lamp
-
USB Type-C connector (USB PORT 2)
Use to connect the timecode adaptor cable or for remote control operation.
About the USB connectors
- Only the USB Type-C connector of USB PORT 1 supports SuperSpeed USB 10 Gbps (USB 3.2). We recommend using USB PORT 1 when connecting the camera to a computer or other device.
- The USB PORT 2 connector can also be used to connect the camera to a computer or other device, but the USB communication will be limited to Hi-Speed USB 480 Mbps (USB 2.0).
- You can supply power and charge the battery using the USB Type-C connector of either USB PORT 1 or USB PORT 2. The charging time is the same regardless of which connector you use.
- You can supply power and support USB communication by using two USB Type-C connectors. In that case, use USB PORT 1 for USB communication and USB PORT 2 to supply power.
- The VMC-BNCU1 timecode adaptor cable (sold separately) is supported on USB PORT 2 only. When using the timecode adaptor cable, use USB PORT 1 for USB communication or power supply, and connect the timecode adaptor cable to USB PORT 2.