Shooting with the picture quality that is set in advance (PICTURE PROFILE)
You can change the setting of coloring or gradation of images to be recorded.
For details about each setting of [PICTURE PROFILE], refer to the following URL. Note that setting contents or setting methods may differ depending on the camcorder you are using.
http://helpguide.sony.net/di/pp/v1/en/index.html
You can make adjustments for the time of day, weather conditions, or just personal preference. Connect the camcorder to a TV or monitor, and adjust the picture quality while observing the picture on the TV or monitor screen.
Picture quality settings for different recording conditions have been stored in ![]() through
through ![]() (picture profile1 through 10) as default settings. You can select the desired picture profile and perform shooting with the settings of the selected picture profile.
(picture profile1 through 10) as default settings. You can select the desired picture profile and perform shooting with the settings of the selected picture profile.
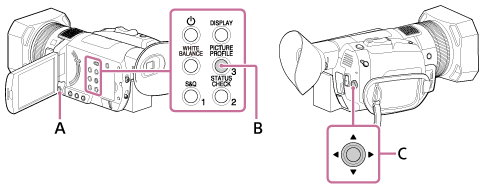
A: MENU button
B: PICTURE PROFILE button (assigned to the ASSIGN3 button by default)
C:  /
/ /
/ /
/ /SET button
- Press the PICTURE PROFILE button during standby.
- Select the picture profile number with the////SET button.
- The picture profiles are set as follows in advance.
OFF:
Does not use the picture profile.
PP1:
Example settings of a color tone with [STANDARD] gamma
PP2:
Example settings with color tone like an interchangeable-lens still camera movie with [STILL] gamma
PP3:
Example settings of natural color tone with [ITU709] gamma
PP4:
Example settings of a color tone with [ITU709 MATRIX] color mode
PP5:
Example settings of a color tone with [CINE1] gamma
PP6:
Example settings of a color tone with [CINE2] gamma
PP7:
Recommended setting when shooting with [S-LOG2] gamma and [S-GAMUT] color mode
PP8:
Recommended setting when shooting with [S-LOG3] gamma and [S-GAMUT3.CINE] color mode
PP9:
Recommended setting when shooting with [S-LOG3] gamma and [S-GAMUT3] color mode
PP10:
Example settings for recording HDR movies with [HLG2] gamma
- The picture profiles are set as follows in advance.
- Select [OK] with the////SET button.
- You can record movies with selected picture profile setting.
To cancel the picture profile recording
Select [OFF] in step 2.
HDR movie recording
The camcorder can record HDR movies if you select HLG, HLG1, HLG2, or HLG3 gamma in PICTURE PROFILE.
As an example setting of HDR recording is preset on PP10 in PICTURE PROFILE, you can view the movie with wider brightness range than ever if it is played back on a TV supported Hybrid Log-Gamma (HLG).
This makes it possible to record images with blocked-up shadows and blown-out highlights, which have been unable to reproduce faithfully in the past.
HLG is a system of high dynamic range TV defined in the international standard Recommendation ITU-R BT.2100.
Note
- To view images recorded with HDR on a TV, connect the camcorder to an HDR (HLG) compatible TV manufactured by Sony with a USB cable.
When you connect a TV with an HDMI cable, you need to change the image quality setting of the TV manually in order to display images properly. Set the image quality of the TV as follows.- Gamma: Setting compatible with HLG
- Color mode: Setting compatible with BT.2020 or 709