Using AC Power
This topic describes the procedure to power the unit using AC power.
-
Slide the pan/tilt lock lever to the LOCK position to lock the pan/tilt of the camera head.
-
Connect the AC adaptor (supplied) to the DC IN connector on the unit, and connect the power cord (supplied) to an AC power source.

A: DC IN connector
B: Power cord
C: AC adaptor
-
Secure the AC adaptor cord using the cord clamper if you want to prevent the cord from being disconnected.
Unlock the cord clamper, route the cord through the clamper as shown below, and lock the clamper.
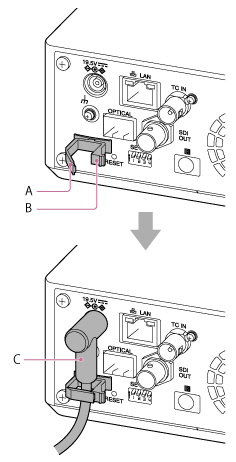
A: Cord clamper
B: Cord clamper lock
C: AC adaptor cord
-
Check that the POWER lamp on the front of the unit changes from blinking green to solid green and that startup has finished.
When the unit has started normally and connected to the network, the NETWORK lamp will light up green.
- When using a lens that does not support pan/tilt operation, lock the pan/tilt lock lever and skip the following steps. For details about lenses that support pan/tilt, contact your dealer or Sony service representative.
-
Slide the pan/tilt lock lever to the UNLOCK position to unlock the pan/tilt of the camera head.
-
Reset the pan/tilt.
- For details, see “Resetting the Pan/Tilt.”
Note
- Do not use any AC adaptor or power cord, other than those provided with the unit. Connecting another adaptor or power cord may cause a fire or malfunction.
- Do not connect and use an AC adaptor in a confined space, such as between a wall and furniture.
- Do not short-circuit the metal parts of the plug of the AC adaptor. Doing so may cause a malfunction.
- Connect the AC adaptor to the nearest AC power source. If a problem occurs during operation, immediately disconnect the power cord from the AC power source.
- When disconnecting the AC adaptor from the unit, grasp the plug and pull it straight out. Pulling on the cable may cause a malfunction.