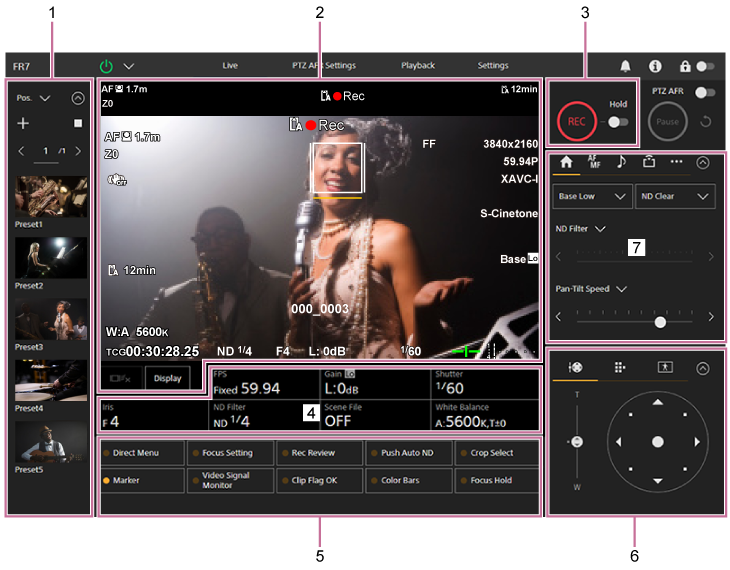
Structure of the Live Operation Screen
This topic describes the structure of the live operation screen.
When PTZ auto framing is off
When PTZ auto framing is on

-
Preset position control panel
Displays the registered position of a preset using a thumbnail. Double-tap the thumbnail to return to the position stored in the preset.
- For details about preset position, see “Saving/Restoring Pan/Tilt, Zoom Position, and Focus Setting Using the Web App.”
- For details about PTZ trace, see “Recording Camera Framing Operations Using the Web App.”
-
Camera image panel
Displays the current camera image and the status of the unit.
It displays the same image as the HDMI output.
The following status is displayed above the image. A red frame or green frame is also displayed around the image according to the received external tally signal.
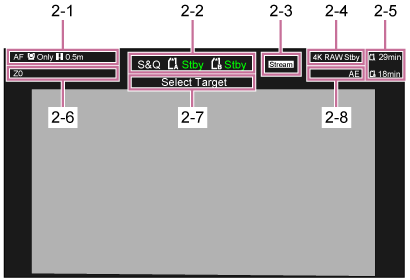
No. Display Description 2-1 Focus mode indicator See “Focus mode indicator” in “Camera Screen Display.” 2-2 Recording mode, slot A/B, Interval Rec recording interval indicator See “Recording mode, slot A/B, Interval Rec recording interval indicator” in “Camera Screen Display.” 2-3 Streaming status indicator Displayed during streaming (when [Stream Setting] is set to [RTMP] or [SRT-Caller] only). 2-4 RAW output operation status indicator Displays the output status of the RAW signal. For details about RAW, see “Recording RAW Video.” 2-5 Remaining media capacity indicator See “Remaining media capacity indicator” in “Camera Screen Display.” 2-6 Zoom position indicator See “Zoom position indicator” in “Camera Screen Display.”
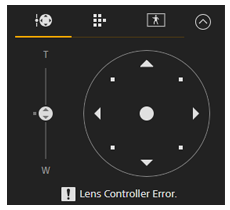
When a lens controller (option) is connected, is displayed. If an error occurs in the lens controller (option),
  is displayed.
2-7 PTZ trace status indicator
PTZ auto framing status indicatorDisplayed when PTZ trace or PTZ auto framing is enabled. 2-8 AE mode/AE level indicator See “AE mode/AE level indicator” in “Camera Screen Display.” [Display] button
Press this button to display camera information on the image.
Press again while the camera information is displayed to hide the camera information.

In addition to markers, some autofocus-related indicators and messages are displayed according to the status, and these cannot be hidden by pressing the [Display] button.
- For details about the displayed camera information, see “Camera Screen Display.”
Realtime tracking AF stop button
Press the button to stop tracking a subject.

- For details, see “Tracking a Specified Subject (Realtime Tracking AF).”
-
Record START/STOP button
Press the button to start recording. During recording, the record START/STOP button lights up red.
Press during recording to stop recording.
You can set the Hold switch to the Hold state to prevent misoperation of the record START/STOP button.
-
PTZ AFR control panel
PTZ auto framing is enabled when the PTZ AFR switch is set to the on position. Tap a person to track in the camera image panel.
You can also set the camera to automatically track a person who appears in a specific position on the PTZ AFR setup screen beforehand. For details, see “Configuring PTZ Auto Framing Initial Settings.”
During tracking, the area around the [Pause] button lights up blue.
A blinking blue light indicates that operator intervention is required. Check the message displayed in the camera control panel and take the required action.
-
Composition preset control panel
Displays the registered framing composition presets as thumbnails. Double-tap a thumbnail to return to the framing stored in the preset.
Displayed when PTZ auto framing is enabled.
-
Camera basic configuration panel
Displays settings for basic functions required for shooting on buttons. Press a button to display the corresponding setup screen for each function in the camera basic configuration adjustment panel below (5).
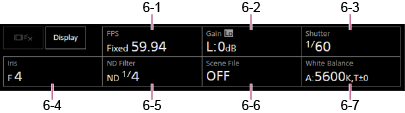
6-1 [FPS]
6-2 [ISO/Gain / Exposure Index]
6-3 [Shutter]
6-4 [Iris]
6-5 [ND Filter]
6-6 [Scene File / Base Look/LUT]
6-7 [White Balance]
- For details, refer to the description of each function.
Function Reference FPS “Slow & Quick Motion” ISO/Gain “Setting the Base Sensitivity,” “Adjusting the Gain Automatically,” and “Adjusting the Gain Manually” in “Adjusting the Gain” Exposure Index “Setting the Base Sensitivity” and “Changing the Distribution of Dark and Bright Areas in the Recorded Image” Shutter “Adjusting the Shutter Automatically” and “Adjusting the Shutter Manually” in “Adjusting the Shutter” Iris “Adjusting the Iris Automatically” and “Adjusting the Iris Manually” in “Adjusting the Iris” ND Filter “About the ND Filter” in “Adjusting the Light Level (ND Filter)” Scene File “Look Overview” and other topics in “Shooting with the Desired Look” Base Look/LUT “Shooting with Look Adjustment in Post-Production” White Balance “White Balance Adjustment Screen” -
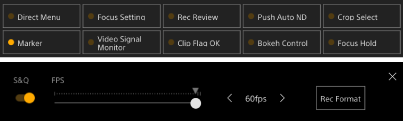
Assignable buttons/Camera basic configuration adjustment panel
Displays assignable buttons during normal operation. Press the camera basic configuration panel buttons (item 6) to display the corresponding setup items. Press the [X] button or press the camera setup panel button again to return to the assignable button display.
- For details about assignable buttons, see “Assignable Buttons.”
- For details about the camera basic configuration adjustment panel, refer to the description of each function.
-
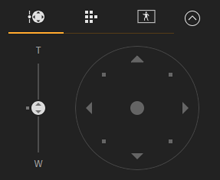
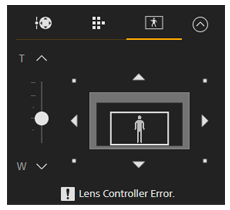
Framing control panel / GUI control panel / AFR composition adjustment panel
Switch between the framing control panel / GUI control panel using the tabs at the top.
You can press the
 (Close) button at the top right of the screen to hide the control panel to prevent inadvertent operation. If the control panel is not displayed, press the
  (Open) button to display it.
Use the framing control panel to adjust the framing. Press the
 (Pan/tilt/zoom) tab to display the framing control panel.
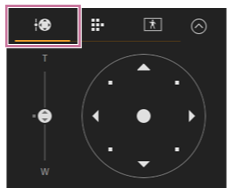
- For details about operation, see “Adjusting the Framing.”
Hint
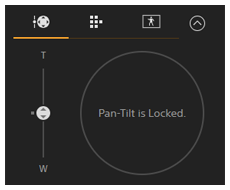
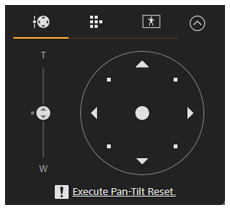
- The joystick part of the framing control panel is displayed as shown below when pan/tilt operation is disabled, when pan/tilt initialization is required, or when an error occurs in the lens controller.
- When pan/tilt operation is locked using the pan/tilt lock lever
- When pan/tilt operation is not initialized

- When pan/tilt operation needs to be reset
- When an error occur in the lens controller
- When pan/tilt operation is disabled
- When pan/tilt operation is locked using the pan/tilt lock lever
- When pan/tilt operation is not initialized or needs to be reset, you can quickly access the
 (Pan/tilt reset) button in the camera control panel by pressing the message displayed below the joystick.
Use the GUI control panel to operate the camera menu, clip playback, and other functions. Press the
 (Cam GUI) tab to display the GUI control panel.
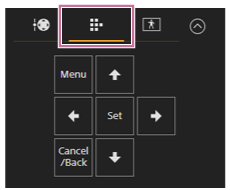
- For details about operation, see “Operating the Camera Menu” and “Playing Recorded Clips.”
Use the AFR composition adjustment panel to adjust the composition for PTZ auto framing. Press the
 (AFR composition adjustment) tab to display the AFR composition adjustment panel.
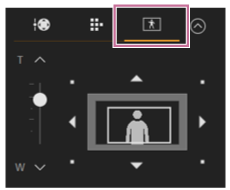
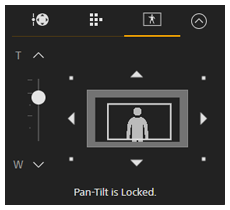
Hint
- The composition adjustment panel part of the AFR composition adjustment panel is displayed as shown below when pan/tilt operation is disabled, when pan/tilt initialization is required, or when an error occurs in the lens controller.
- When pan/tilt operation is locked using the pan/tilt lock lever
- When pan/tilt operation needs to be initialized

- When an error occur in the lens controller
- When pan/tilt operation is locked using the pan/tilt lock lever
For operation, see “Specifying the Subjects for Automatic Tracking (manual tracking start mode).”
-
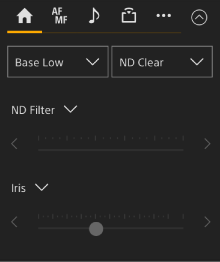
Camera control panel
Use to configure the functions required to operate the camera.
Switch between the screens to display using the tabs at the top.
You can press the
(Close) button at the top right of the screen to hide the control panel to prevent inadvertent operation. If the control panel is not displayed, press the (Open) button to display it.
- For details, see the description of each function.
 (Main) tab
Displays the setup items for frequently used functions.
The top and bottom slider functions can be changed by pressing the [▼] button and selecting from the displayed list. The following functions can be selected.
- ND Filter
- Iris
- ISO*
- Gain*
- Exposure Index*
- AE Level
- Zoom Speed
- Pan-Tilt Speed
*Displayed according to menu settings.
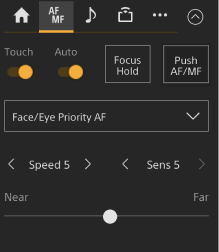
 (Focus) tab
Displays the setup items related to focus.
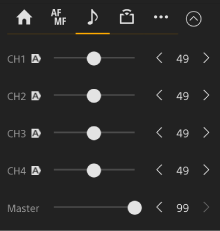
 (Audio) tab
Displays the setup items related to audio.
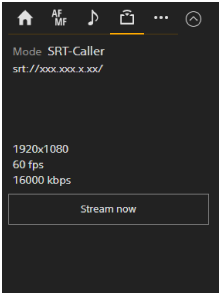
 (Stream) tab
Displays the setup items related to streaming.
The items displayed will vary depending on the streaming format setting.
When set to [RTMP] or [SRT-Caller], streaming can be started/stopped on this screen.
- For details, see “About Streaming” and other topics in “Configuring Streaming.”
- Error information is displayed if a connection failure occurs. For details about error information, see “Error/Warning Messages.”
 (Others) tab
Displays the setup items related to other functions.
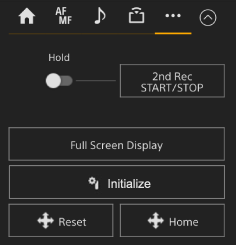
Pressing the [Full Screen Display] button opens a new tab in the web browser and displays the camera image panel image in full screen.
Only image display occurs; touch AF and other functions are not available.Note
- The live operation screen on the original tab continues to function. It is recommended that you close the tab to reduce the number of simultaneous connections if no operation is required.
Press the
 (Initialize lens controller) button to initialize the lens controller (third-party option). This button is enabled only when [Technical] > [Lens Controller] > [Zoom] > [Setting] is set to [On] in the web menu.