Location and Function of Parts of the Infrared Remote Control (supplied)
This topic describes the location and function of pars of the infrared remote control (supplied).
-
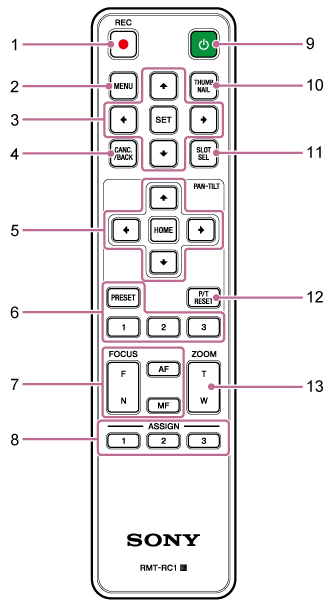
REC● (record START/STOP) button
Press to start or stop recording.
-
MENU button
Press to show or hide the camera menu.
-
GUI control buttons
Press to perform operations in the camera menu, in message dialogs that include buttons, and other screen display functions.
-
CANC./BACK button
Press to cancel a setting or to return to the previous screen of the camera menu of the unit.
-
Pan and tilt control buttons
Press the arrow buttons to control the pan/tilt of the camera. Press the HOME button to return the orientation of the camera to face the front.
-
Preset position control buttons
Press and hold the PRESET button and press one of the 1 to 3 buttons to store camera direction, zoom, and focus adjustment status in the pressed number button.
Press a number button with stored settings to recall the saved state.
-
Focus control buttons
Use to adjust the focus.
To adjust the focus automatically, press the AF button.
To adjust the focus manually, press the MF button, then press either the F (Far) button to focus on far subjects or the N (Near) button to focus on near subjects.
-
Assignable buttons 1 to 3
Executes the functions assigned to the assignable buttons using the camera menu.
If you assign the [Direct Menu] function to an assignable button, you can adjust the exposure, white balance, and other settings using the GUI control buttons.
- For details about assignment using the camera menu, see “Assignable Buttons.”
- For details about the direct menu, see “Direct Menu Operation.”
-
 (power) button
Press to turn on the unit or to switch the power supply to standby state.
-
THUMBNAIL button
Displays the thumbnail screen showing the clips recorded on the memory card of the unit.
- For details about the thumbnail screen, see “Thumbnail Screen.”
You can select clips and control playback on the thumbnail screen using the GUI control buttons.
- For details about selecting clips and controlling playback, see “Playing Recorded Clips” and “Operations on Recorded Clips.”
-
SLOT SEL (memory card slot (A)/(B) select) button
When two memory cards are inserted, press the button to switch between the memory cards for recording.
Press this button while the thumbnail screen is displayed to switch between the memory cards to view.
-
P/T RESET (pan/tilt reset) button
Resets the pan/tilt functions. Press the button when the POWER lamp and NETWORK lamp are blinking simultaneously or when [Execute Pan-Tilt Reset] is displayed in the framing control panel in the Web App.
-
Zoom control buttons
To zoom in, press the T (telephoto) button.
To zoom out, press the W (wide) button.
Infrared remote control battery
The infrared remote control requires two AA (LR6) batteries.
Insert the batteries into the infrared remote control as shown in the following diagram.
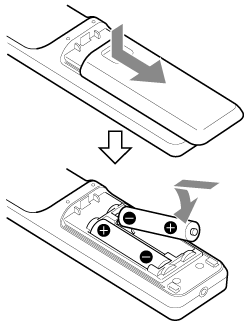
Note
- Do not use any batteries other than manganese or alkaline batteries as they may rupture.
- Dispose of used batteries according to the laws and regulations of the country or region.