Operating the Camera Menu
When the [Menu] button in the GUI control panel or the MENU button on the infrared remote control is pressed, the camera menu for configuring the various required settings for shooting and playback is displayed in the camera image panel.
The menu is operated using buttons in the GUI control panel.
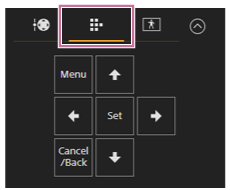
[Menu] button: Press to display the camera menu. Press again while the camera menu is displayed to hide the menu.
Arrow buttons: Press the arrows buttons to move the cursor up/down/left/right in the camera menu to select menu items or settings.
[Set] button: Press to apply the selected item.
[Cancel/Back] button: Press to return to the previous menu. An uncompleted change is canceled.
Note
- Some items cannot be selected, depending on the state when the menu was displayed.
Setting Menu Items
Move the cursor to the item you want to set using the arrow buttons in the GUI control panel and press the [Set] button to apply the setting.
- The menu item selection area displays up to eight lines. If the available options for an item cannot be displayed at the same time, scroll the display by moving the cursor up/down.
- For sub-items with a large settings range (for example, −99 to +99), the settings area is not displayed. The current setting is highlighted to indicate that the value can be changed.
- Selecting [Execute] for a function will execute the corresponding function.
- Selecting an item that requires confirmation before execution will temporarily hide the menu and display a confirmation message. Check the message, and then select whether to execute or cancel the function.