Recording RAW Video
You can record the RAW video signal output from the SDI OUT connector of the unit to a supported external recorder.
The supported RAW output formats are shown below.
| System frequency | [Codec] | [RAW Output Format] |
|---|---|---|
| 59.94 / 50 / 29.97 / 25 / 23.98 | RAW | 4096×2160 |
| RAW | 3840×2160 | |
| RAW & XAVC-I | 4096×2160 | |
| RAW & XAVC-I | 3840×2160 | |
| 24 | RAW | 4096×2160 |
| RAW & XAVC-I | 4096×2160 |
-
Connect an external RAW recorder to the SDI OUT connector of the unit.
-
Set [Project] > [Base Setting] > [Shooting Mode] to [Cine EI], [Cine EI Quick], or [Flexible ISO] in the web menu or camera menu.
-
Set the angle of view (FF only) using [Project] > [Rec Format] > [Imager Scan Mode] in the web menu or camera menu.
-
Set [Project] > [Rec Format] > [Codec] to [RAW] in the web menu or camera menu.
Selecting [RAW & XAVC-I] will simultaneously record video to an external RAW recorder and video to the memory cards in the unit.
-
Set the resolution using [Project] > [Rec Format] > [RAW Output Format] in the web menu or camera menu.
-
Check that the external recorder is turned on, then press the record START/STOP button on the live operation screen.
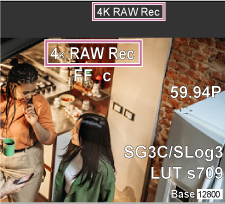
The RAW video recording status is indicated by an icon in the camera image panel.
Note
- The recording control signal is output from the SDI OUT connector of the unit, but it is not possible to get the status of the external recorder. Accordingly, the unit may indicate RAW video recording is in progress when the external recorder is not actually recording. Check the indicator on the external recorder to obtain the correct operating status.
Note
- When recording is started on an external recorder without using the record START/STOP button on the live operation screen, clips may not be recorded properly.