Rear side
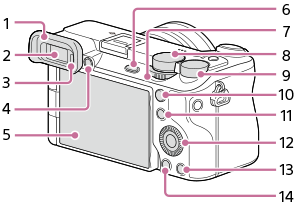
- Eyepiece Cup
Attaching/removing the eyepiece cup
Match the eyepiece cup to the groove on the viewfinder and slide it into place.

To remove the eyepiece cup, grasp it on the left and right sides and lift it up.
- Viewfinder
- Eye sensor
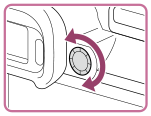
- Diopter-adjustment dial
Adjust the diopter-adjustment dial according to your eyesight until the display appears clearly in the viewfinder.
If it is hard to operate the diopter-adjustment dial, remove the eyepiece cup before operating the dial.
- Monitor (For touch operation: Touch panel/Touch pad)
You can adjust the monitor to an easily viewable angle and shoot from any position.
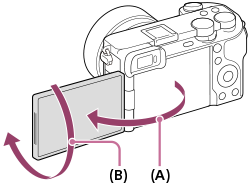
(A): Approx. 176°
(B): Approx. 270°
- You may not be able to adjust the monitor angle depending on the type of a tripod you use. In such a case, release the tripod screw once to adjust the monitor angle.
- Do not apply excessive force when opening, closing, or rotating the monitor. Doing so may cause a malfunction.
- MENU button
- Still/Movie/S&Q dial
You can switch the shooting mode.
- Mode dial
- Rear dial
You can quickly adjust the settings for each shooting mode.
- For shooting: AF-ON (AF On) button
For viewing:
 (Enlarge) button
 - For shooting: Fn (Function) button
For viewing:
 (Send to Smartphone) button
You can display the screen for transferring images to a smartphone by pressing this button.
- Control wheel
- For shooting: C3 button (Custom button 3)
For viewing:
 (Delete) button
 -
 (Playback) button