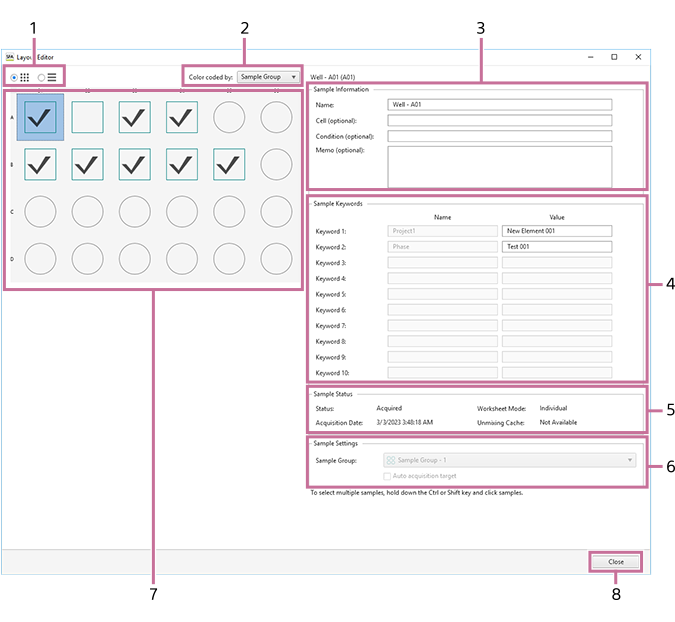
[Layout Editor] Dialog
The [Layout Editor] dialog is used to edit the sample information and add keywords to the sample.
The [Layout Editor] dialog is displayed by clicking [Layout Editor] of [Plate] group on the [Analysis] tab of the ribbon.
-
View
You can switch the display to list view or map view.
The icon of a well/tube varies depending on the worksheet mode.
 : [Shared] mode
 : [Individual] mode
 -
[Color coded by]
You can sort wells by color for selected metadata.
- Sample Group
- Cell
- Condition
-
[Sample Information]
You can edit information about a sample.
[Name]
Enter the name of the well.
[Cell (optional)]
Enter information about the cell, as required.
[Condition (optional)]
Enter the condition of the sample, as required.
[Memo (optional)]
Enter a comment, as required.
-
[Sample Keywords]
You can edit the sample keywords for the keyword names set in an experiment.
[Name]
Displays the keyword names configured in the experiment.
[Value]
Enter a sample keyword.
-
[Sample Status]
Displays the acquisition status of the sample.
[Status]
Displays the acquisition status of the sample.
[Acquisition Date]
Displays the acquisition date and time.
[Worksheet Mode]
Displays the worksheet mode.
[Unmixing Cache]
Displays whether data for which fluorescence unmixing calculation has completed exists.
-
[Sample Settings]
Displays settings related to sample acquisition.
[Sample Group]
Selects the sample group to which the sample belongs.
[Auto acquisition target]
Place a check mark in the checkbox to set as the auto acquisition target.
-
Wells
Displays the status of each well using icons.
 : Data recording has completed.: Data has not been acquired yet.
The icon varies depending on the worksheet mode.
: [Shared] mode: [Individual] mode -
[Close]
Closes the dialog.